Elearning plugin 1.1.0 / Using Elearning
Create and teach a course
This page is for members who create courses: how to create a course, fill it with sections, lessons and quizzes, publish it, follow your students and their quiz results, teach with other instructors, see what you earn and change the course settings. The steps describe the website; the mobile apps offer the same.
Create a course#
Last updated: 2026-11-19 · v1.1.0
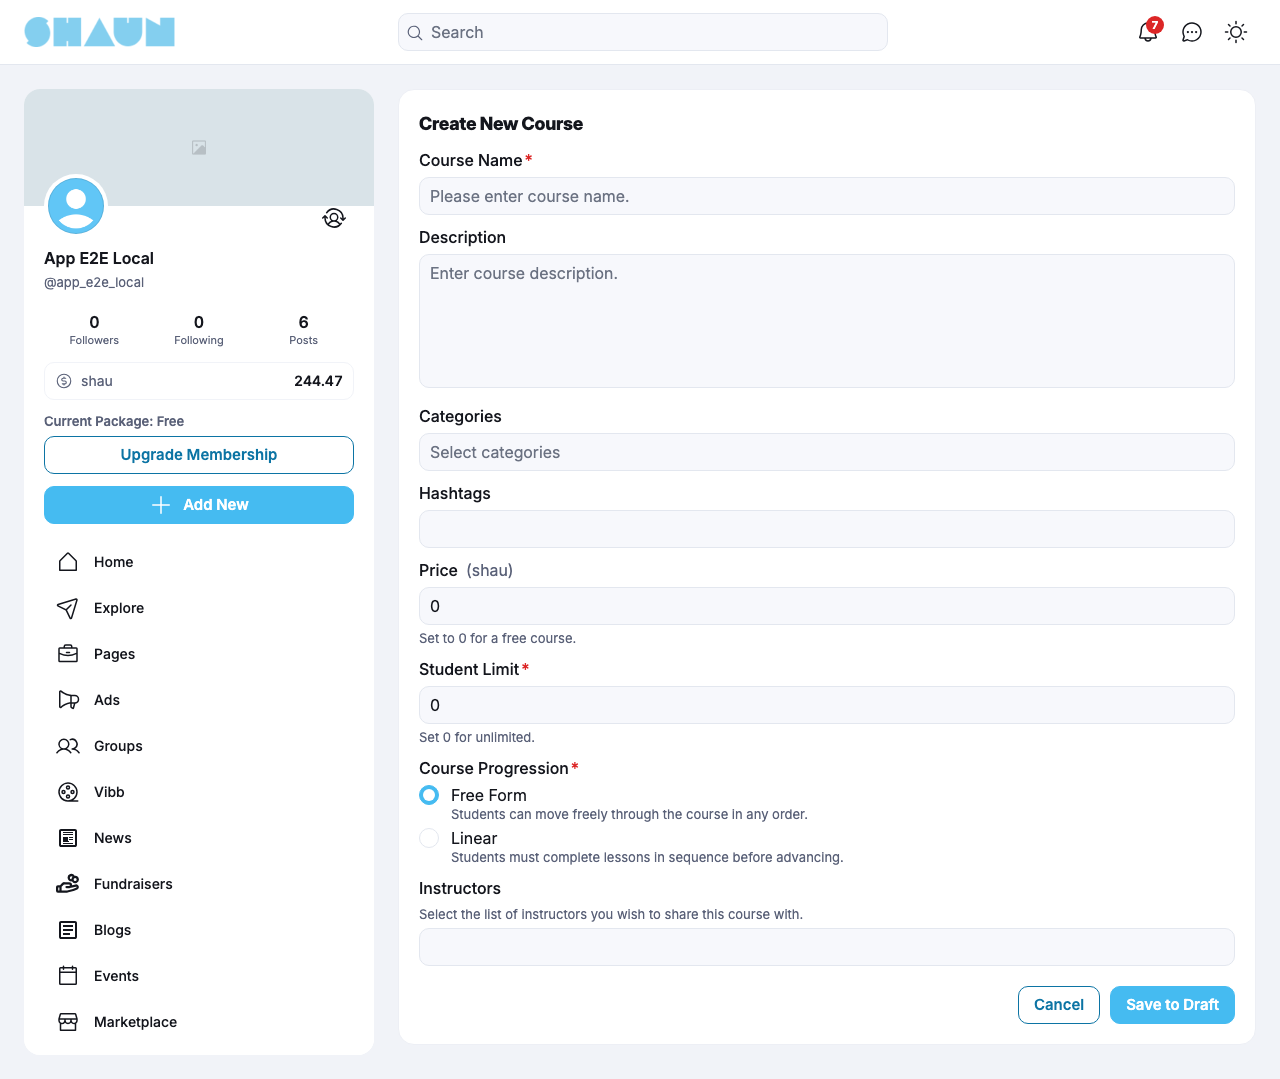
- Click Courses in the site menu, then Create new course. Or click Add New → Course.
What you should see: the form Create New Course. If your member level may not create courses, you see "You don't have course creation permission." instead.
- Fill in the form:
Field What to enter Course Name required, up to 255 characters Description optional: what students will learn Categories optional, one or more Hashtags optional; members who follow these hashtags see the course in their For You tab Price in the site's eWallet tokens (the token name is shown next to the label). 0 makes the course free. Students pay the price from their eWallet; you receive it minus the site's fee Student Limit the most students who may take the course; 0 for unlimited Course Progression Free Form: "Students can move freely through the course in any order." Linear: "Students must complete lessons in sequence before advancing." Instructors optional: type at least two letters of the name of one of your followers to add them as instructors (see Instructors) - Click Save to Draft.
What you should see: "Your course has been created." and the course page. The course is not published yet: only you and its instructors see it. Each instructor is told "… assigned you as course instructor."
If the site limits how many courses you may create per day, a course over the limit is refused with a message such as "To prevent spam, we only allow you to share a maximum of 3 courses per day."
Add sections, lessons and quizzes#
Last updated: 2026-11-19 · v1.1.0
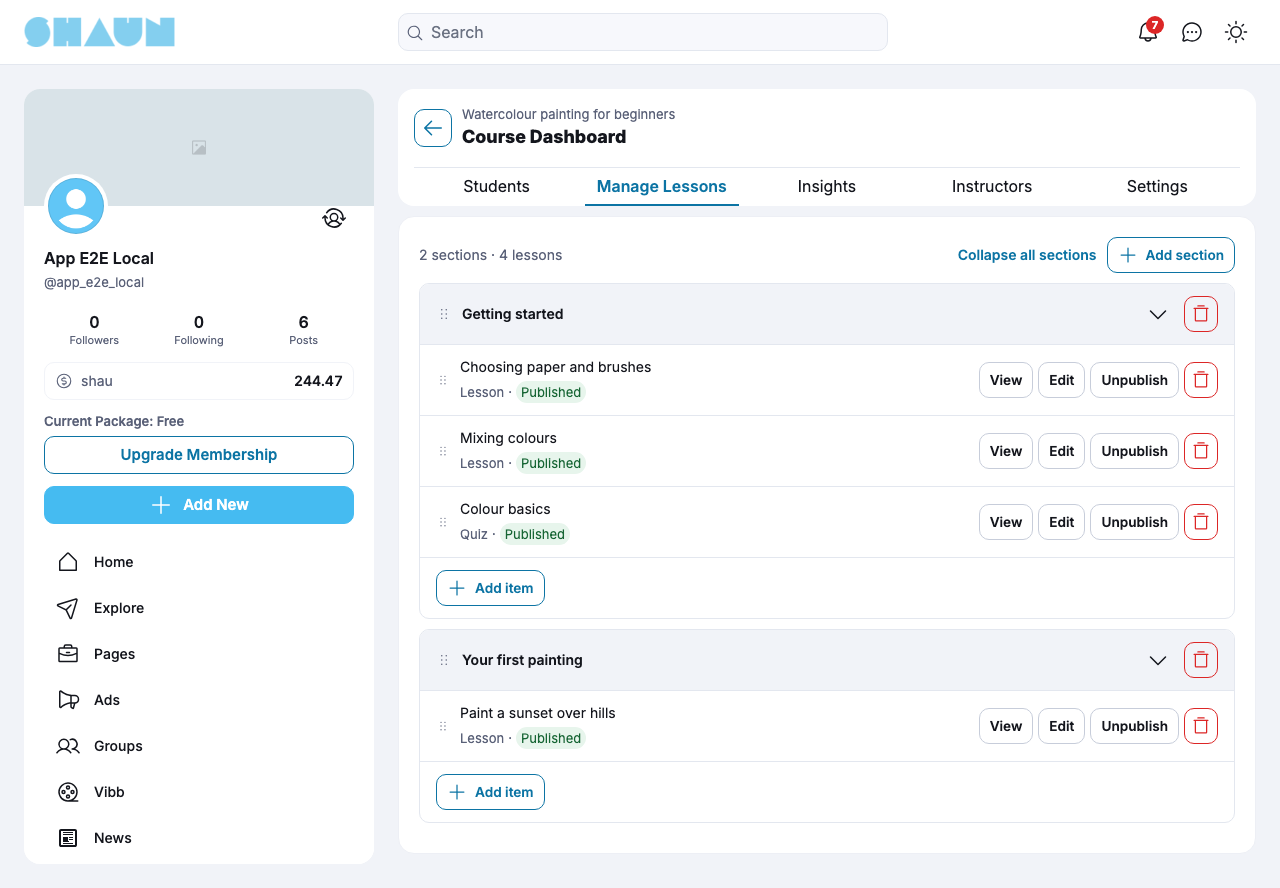
On the course page, click Dashboard, then the Manage Lessons tab. The course creator and its instructors can all do this. A course is made of sections; each section holds lessons and quizzes.
- Click Add section, enter the Section name and click Add. Click a section's name to rename it; drag a section by its handle to move it.
- In a section, click Add item, then Add Lesson or Add Quiz.
- Drag lessons and quizzes by their handle to change the order. With Linear progression, students take them in this order.
Each item shows Lesson or Quiz and Published or Draft, with View, Edit, Publish or Unpublish and a delete button. Students see published items only.
- Publishing a lesson or a quiz tells every student "… published a new lesson in course." (or quiz).
- Unpublishing or deleting an item removes the students' completions of it, and their progress is worked out again. Deleting a section deletes all its lessons and quizzes: "Do you want to delete this section? All lessons and quizzes inside will be removed."
Write a lesson#
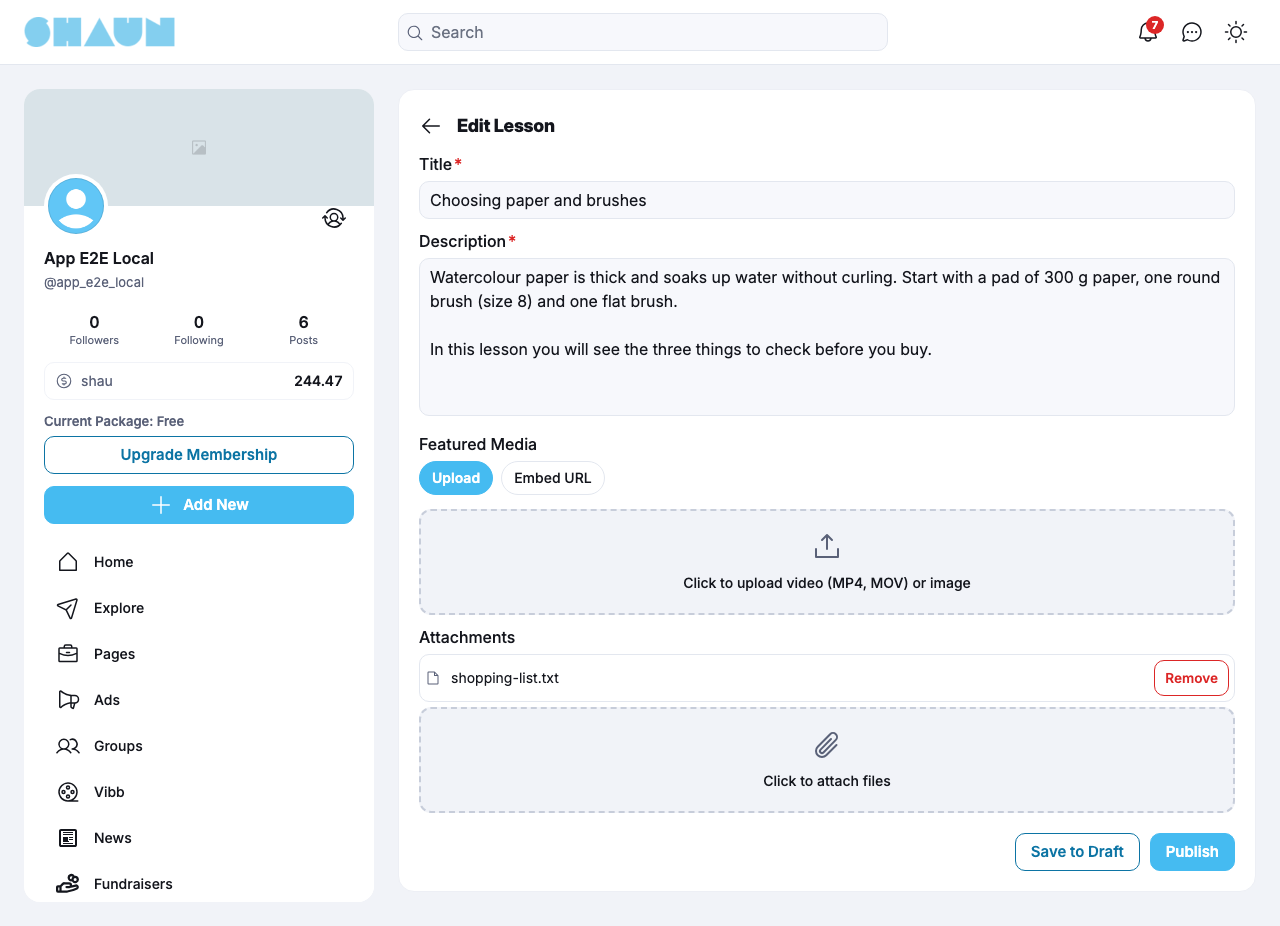
| Field | What to enter |
|---|---|
| Title | required, up to 255 characters |
| Description | required: the text of the lesson |
| Featured Media | Upload: a video (MP4, MOV, M4V or WEBM) or an image (JPG, PNG, GIF or WEBP), up to the site's upload size. Or Embed URL: the link of a video on YouTube, Vimeo, Wistia or a similar site |
| Attachments | optional files students can download, such as a PDF or a worksheet. Only the file types the site allows, and at most the number of files your member level allows per lesson (2 after installing) |
Click Publish to show the lesson to students ("Lesson published."), or Save to Draft to finish it later ("Lesson saved as draft."). When you change the text or the media of a published lesson, the students are told "… updated a course lesson."
Make a quiz#
- Enter the quiz Title, an optional Description, the Duration (minutes) and the Pass Score (%), from 1 to 100 (70 if you leave it empty). The duration is shown to students as a guide; the quiz is not stopped when the time is up. 0 means no duration is shown.
- Click Add the Questions.
What you should see: "Quiz created. Now add your questions." The quiz is saved as a draft and its Questions tab opens.
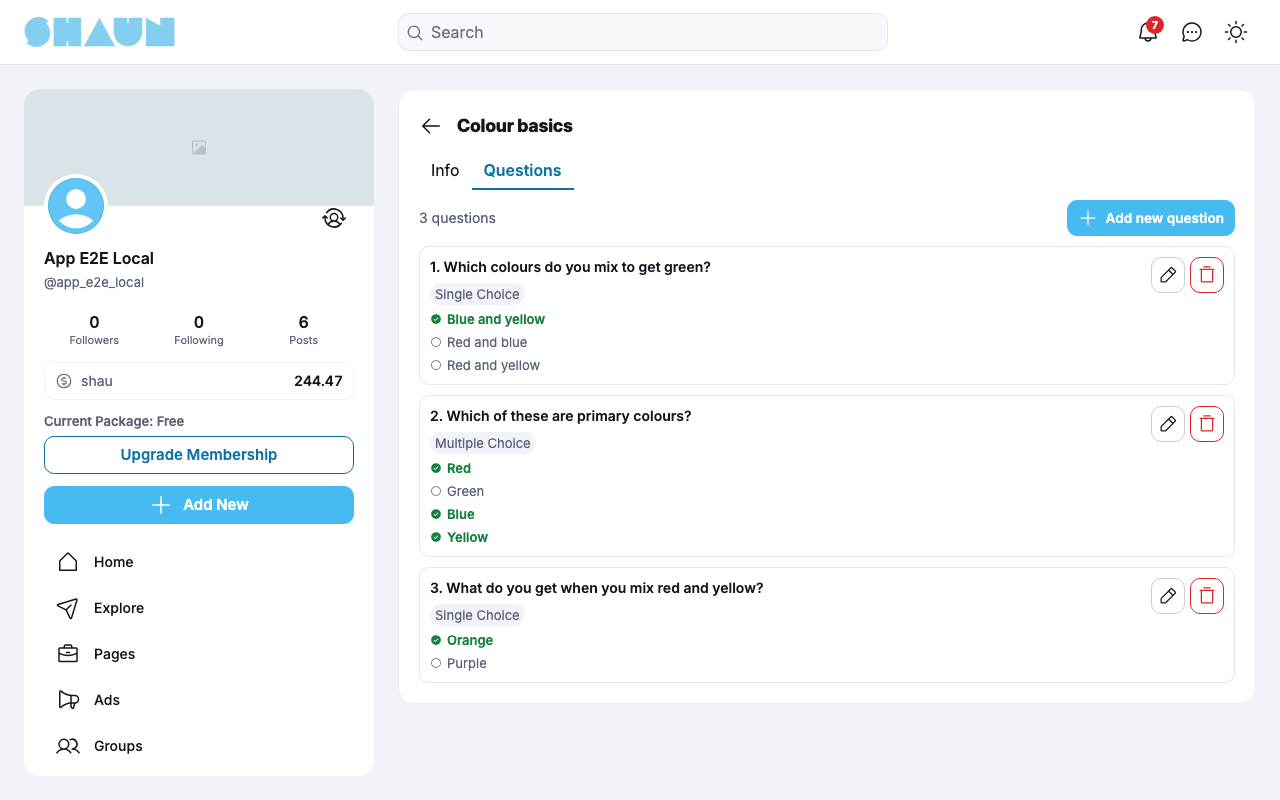
- Click Add new question. Enter the Question text, choose the Question Type, Single Choice (exactly one correct answer) or Multiple Choice (one or more correct answers), fill in the answer options (Add option for more) and mark the correct ones. Click Save Question.
- When the quiz has enough questions (2 after installing), click Publish on the Manage Lessons tab or
in the quiz form.
What you should see: the quiz shows Published. With too few questions you see "Quiz must have at least 2 questions to publish."
Each question needs at least the number of answer options the site sets (2 after installing). If you delete questions from a published quiz until it has fewer than the minimum, it goes back to draft.
Publish the course and change its details#
Last updated: 2026-11-19 · v1.1.0
When the course has its content, click Publish on the course page (or on the Settings tab of the dashboard). Only the course creator can publish or unpublish.
- Published: "Course published." The course appears in the course lists and in search, members can take it, and your followers are told "… published a new course."
- Unpublish: "Course unpublished." The course leaves the lists and search and no one new can take it. Students who already took it keep their access. To stop offering a course for good, unpublish it: members cannot delete a course.
Your courses, published or not, are under Courses in your Lists, with a Status filter (see Lists in the ShaunSocial guide).
Change the course details#
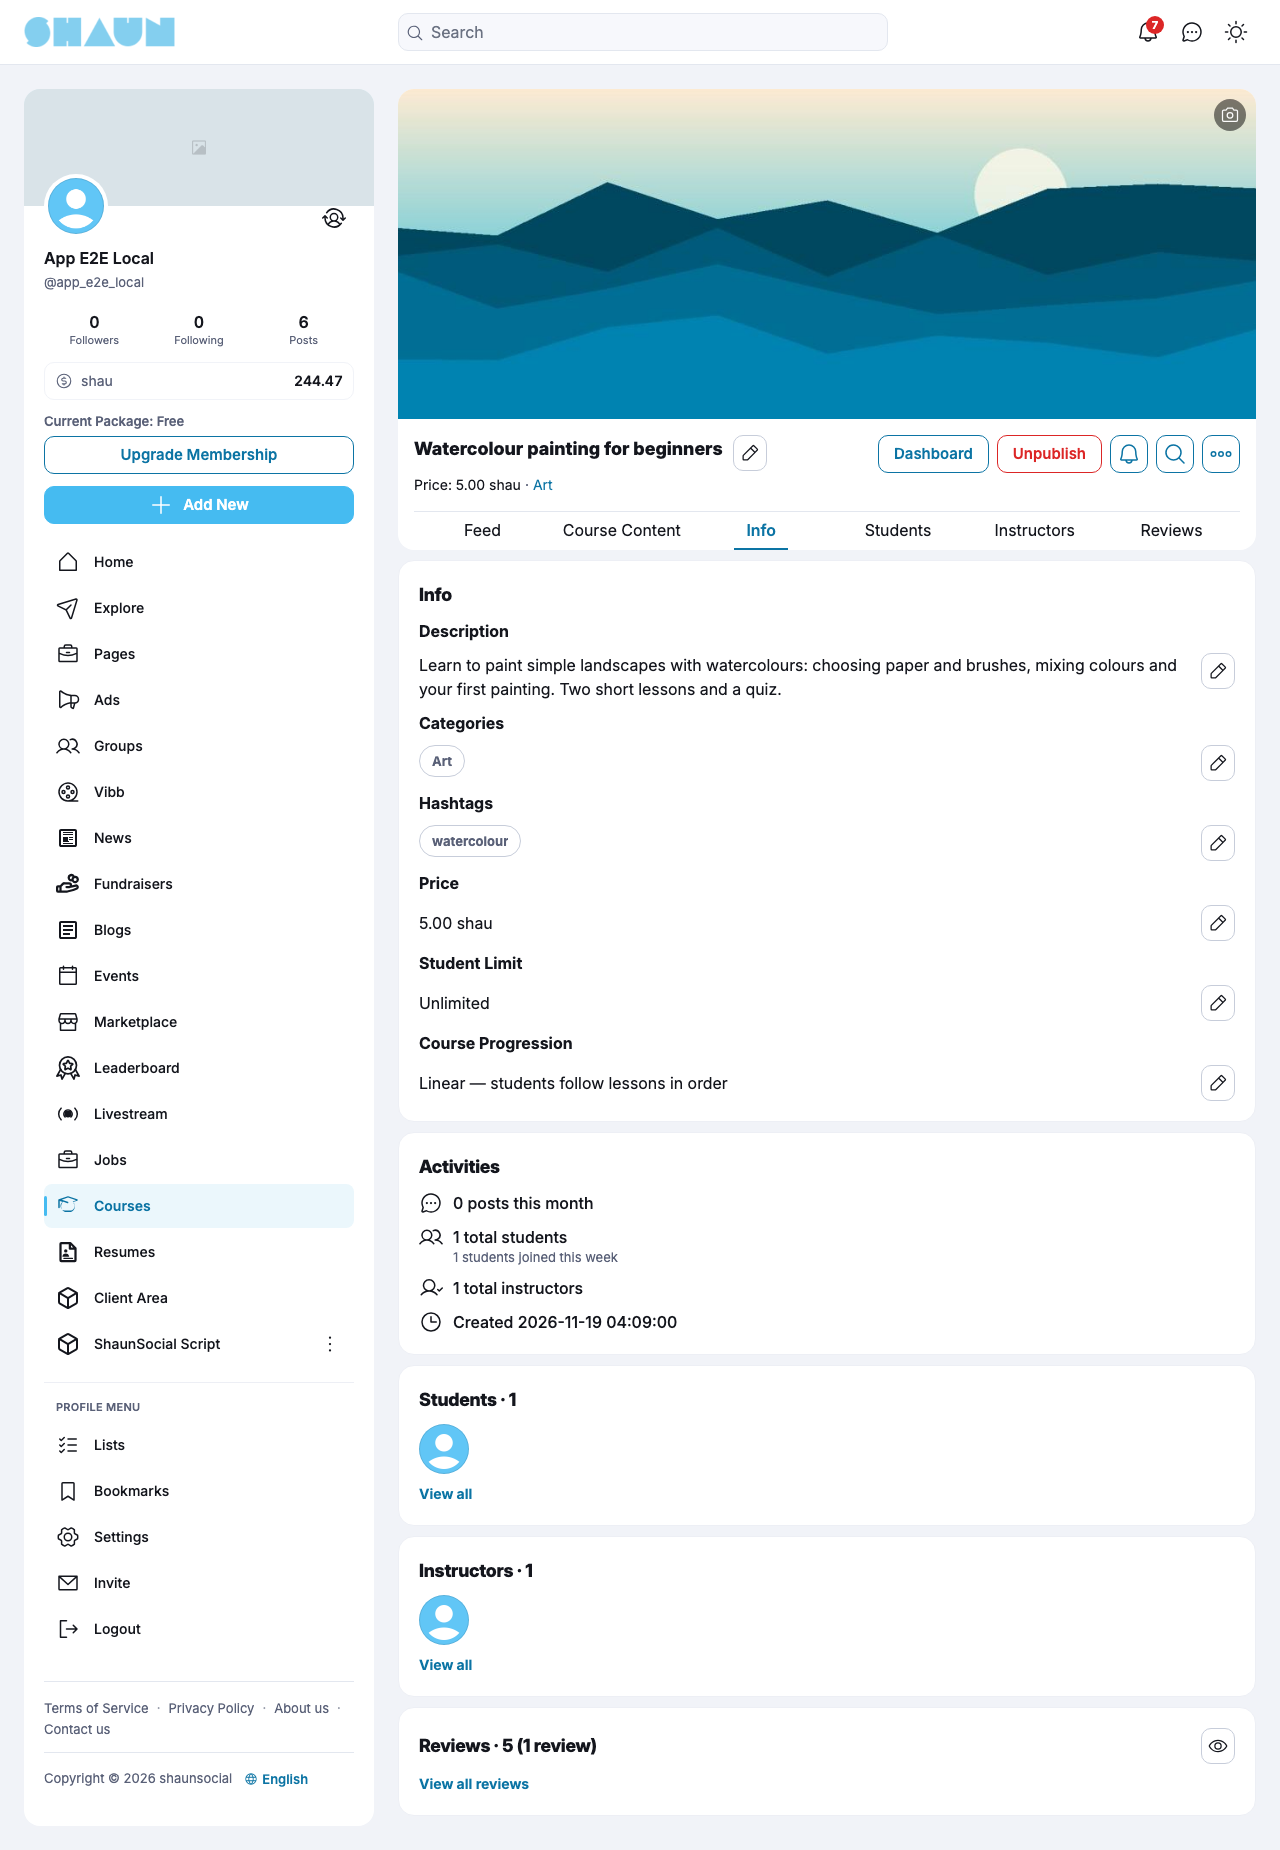
On the course page you and the instructors can change the cover (camera button), the name (pencil next to it), and on the Info tab the description, categories, hashtags and progression. Only the course creator can change the price and the student limit. A new price applies to students who take the course afterwards.
Students and quiz results#
Last updated: 2026-11-19 · v1.1.0
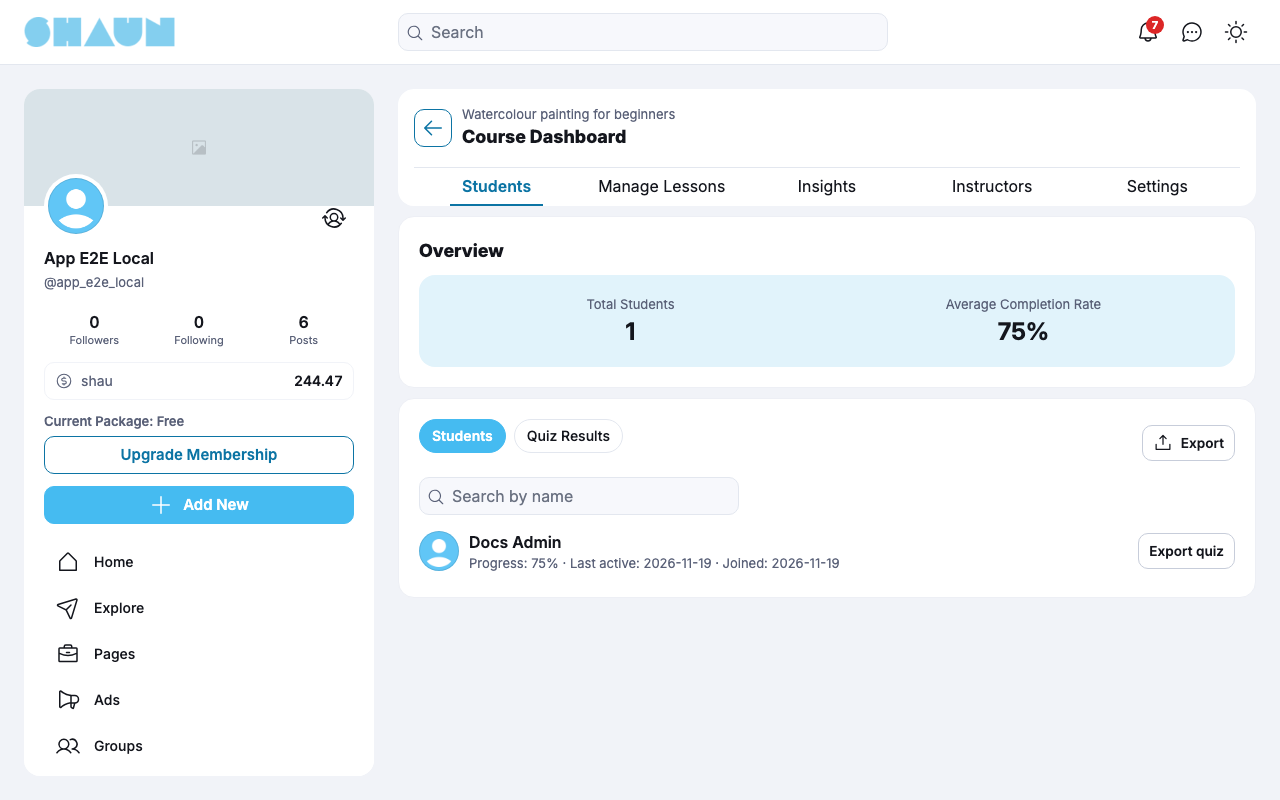
The course Dashboard opens on the Students tab. The course creator and its instructors see it.
- Overview: the Total Students and the Average Completion Rate.
- Students: each student with their Progress, when they were Last active and when they Joined. Search by name finds a student.
- Export downloads a spreadsheet file (CSV) of all students with their name, e-mail address, progress, last activity and joining date. Export quiz on a student downloads that student's quiz results.
- Quiz Results: every submitted quiz, newest first, with the quiz, the date, the score, Pass or Fail. View result shows the student's answer to each question, with the correct answers.
When a member takes your course you are told "… took your course." (you can turn this off with the bell button on the course page, Take the course).
Instructors#
Last updated: 2026-11-19 · v1.1.0
Instructors help you run the course. The Instructors tab of the dashboard lists them, with you marked Owner.
- To add instructors, click Add Instructor, search your followers (Search users), choose one or more and click Save ("Instructors added."). Each one is told "… assigned you as course instructor." Only the course creator can add instructors, and only from their followers.
- Remove takes an instructor off the course ("Do you want to remove this instructor?"). The creator can remove any instructor; an instructor can remove only themselves.
| Who | What they can do |
|---|---|
| Course creator (owner) | everything: content, students, quiz results, earnings, settings, instructors, publish and unpublish, price and student limit, reviews on or off |
| Instructor | sections, lessons, quizzes and their files; the course details except price and student limit; students, quiz results and the exports; the Insights tab; who can post, the web address and new enrollments; pinning and removing posts in the course feed |
Instructors do not receive any of the money of a paid course, cannot take the course as students and cannot review it.
What you earn#
Last updated: 2026-11-19 · v1.1.0
Each time a member takes your paid course, the price is taken from their eWallet and you receive the price minus the site's fee in yours, straight away. The fee is a percentage set by the site for your member level. The full rules are in Paid courses: who pays, who receives.
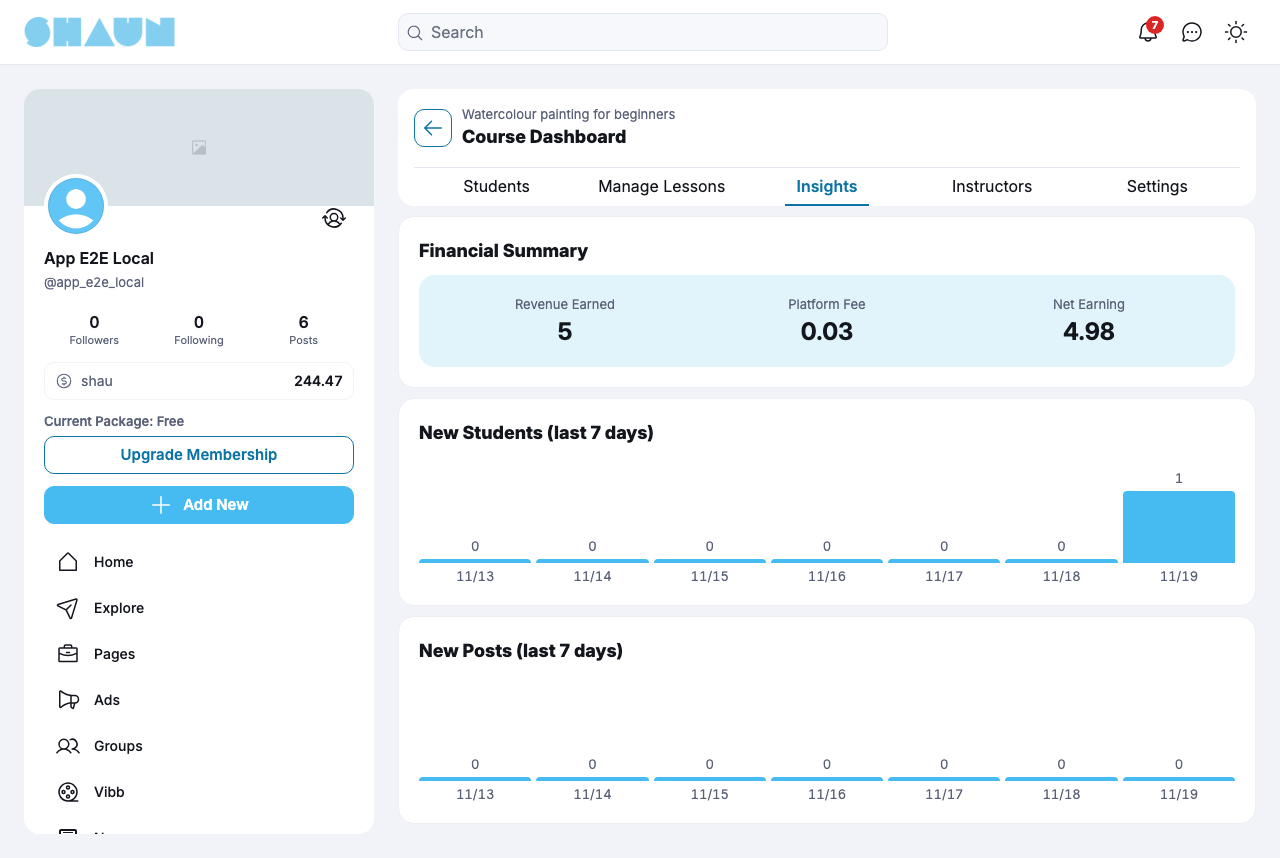
The Insights tab of the dashboard shows:
- Financial Summary: Revenue Earned (all prices students paid), the Platform Fee (the site's part) and your Net Earning, in tokens, as charged at each purchase. Amounts are rounded to 2 decimals.
- New Students (last 7 days) and New Posts (last 7 days), as charts.
Each sale also appears in your eWallet as "Course earnings from … (…)" with the price, the fee and the net amount. You can transfer your balance out like any eWallet balance (see Withdraw).
Course settings#
Last updated: 2026-11-19 · v1.1.0
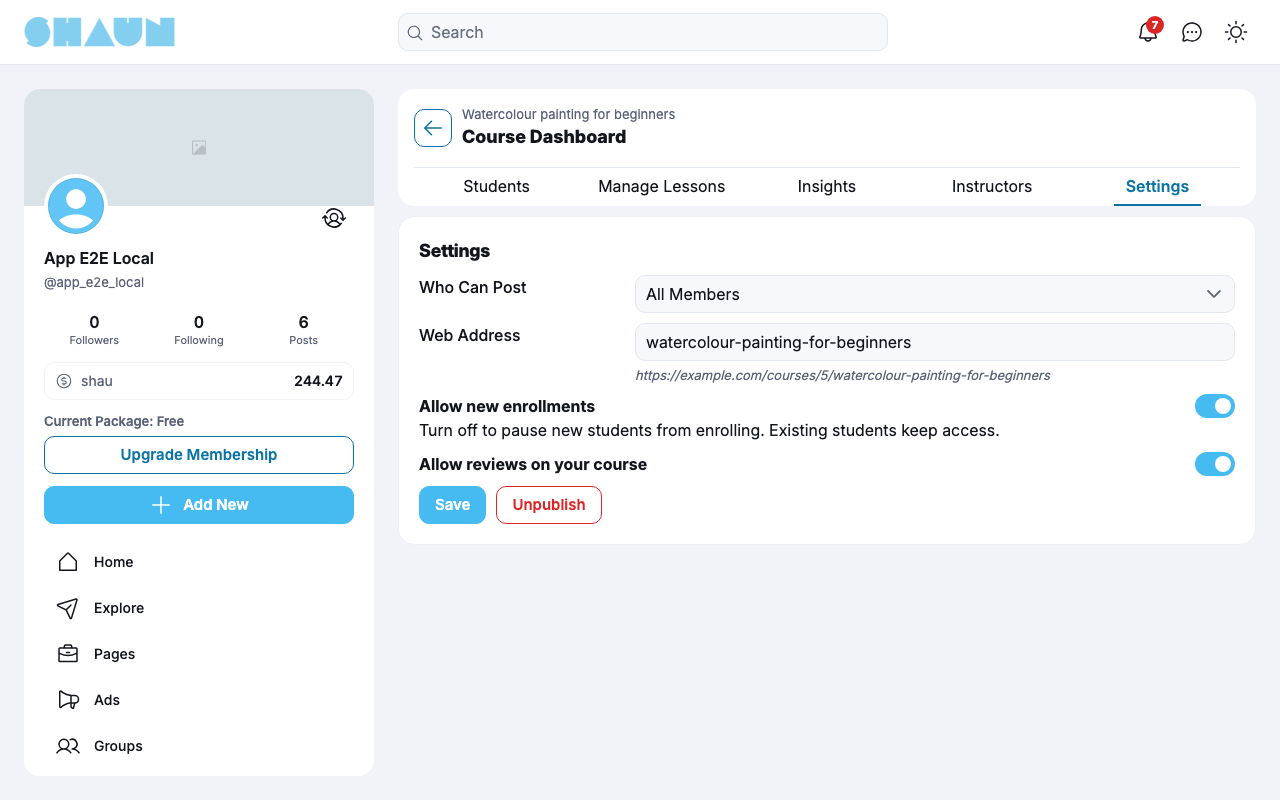
The Settings tab of the dashboard. Change what you need and click Save ("Settings saved.").
| Setting | When the course is created | What it does |
|---|---|---|
| Who Can Post | All Members | who may post in the course feed: All Members (the creator, the instructors and the students), Course Owner and Instructors, or Course Owner Only |
| Web Address | made from the course name | the last part of the course's address, shown below the field. Letters, numbers, dashes and underscores; another course may not use it ("This slug is already in use.") |
| Allow new enrollments | on | "Turn off to pause new students from enrolling. Existing students keep access." While it is off, members who try to take the course see "Enrollment for this course is currently paused. Please come back later to enroll." |
| Allow reviews on your course | on | lets students write a review. Only the course creator can change it |
The Publish / Unpublish button on the same tab works like the one on the course page (see Publish the course).
Change log#
Last updated: 2026-11-19 · v1.1.0
| Date (GMT+7) | Section | What changed |
|---|---|---|
| 2026-11-19 | all | First version for Elearning 1.1.0, written from the 1.1.0 code. |
| 2026-11-19 | screenshots | Screenshots from a demo site running Elearning 1.1.0, with a demo course of two sections, three lessons and a three-question quiz, bought once for 5 tokens. |
| 2026-11-19 | all | Pages reorganised: AdminCP content now has its own pages. |