OpenID plugin allows SSO login in ShuanSocial site via any OAuth/OpenID Connect Identity provider such as facebook, google, apple…, and others. This plugin allows secure login to your ShuanSocial site without having to remember a username and password.
Because setup a new open ID is quite technical task, we already add popular providers like facebook, google, linkedin and X. Site owner can add their client id and client secret to enable these popular providers. For the new provider, please hit on “Create new” to add new. Check the configuration of existing providers to know how to fill in data for it can feel free to contact us if you have any questions.
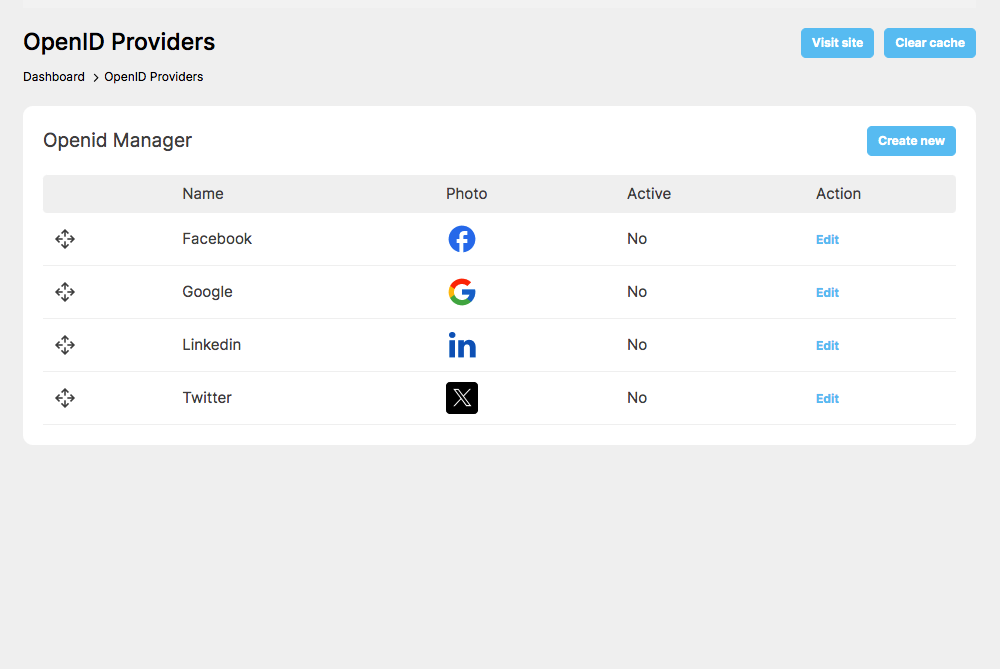
To add a provider

- Click add new
- Enter name
- Enter App name
- Return url (It’s used to add to your providers like facebook, google)
- Delete user url (It’s used to add to your providers like facebook, google)
- Add logo
- Server
- Enter client Id
- Enter scope
- Enter authorize endpoint
- Enter access token endpoint
- Enter get UserInfo endpoint
- Enter User id map
- Enter Email map
- Enter Name map
- Enter Avatar map
- Activate the provider
- Click Submit
For existing providers, please follow this article to find out how can quickly config the Facebook, X, Google and Linkedin application for OpenID Connect.
CONFIG FACEBOOK
1/ Go to developers.facebook.com
2/ Login your developer account & select My apps/Add a New App
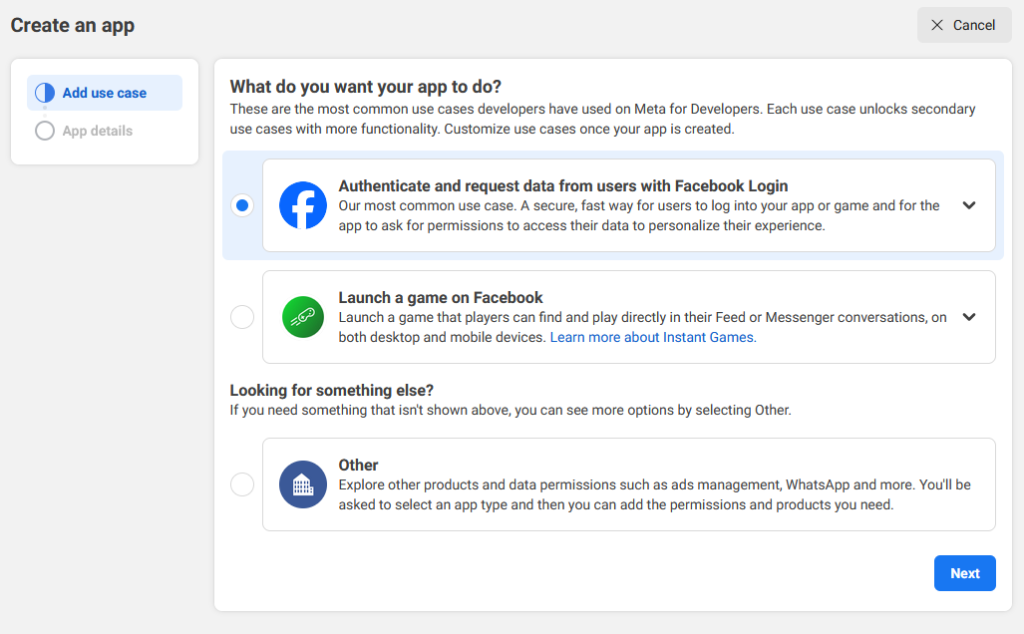
3/ Add use case: select Authenticate and request data from users with Facebook Login
and click on Next button
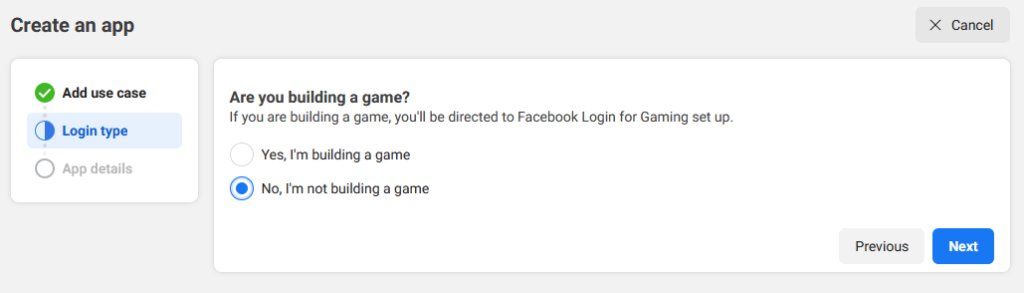
4/ Login type: Select No, I’m not building a game
and click on Next button
5/ App detail: Enter your app name, your contact email and select your Business porfolio if any
and click on Create app button

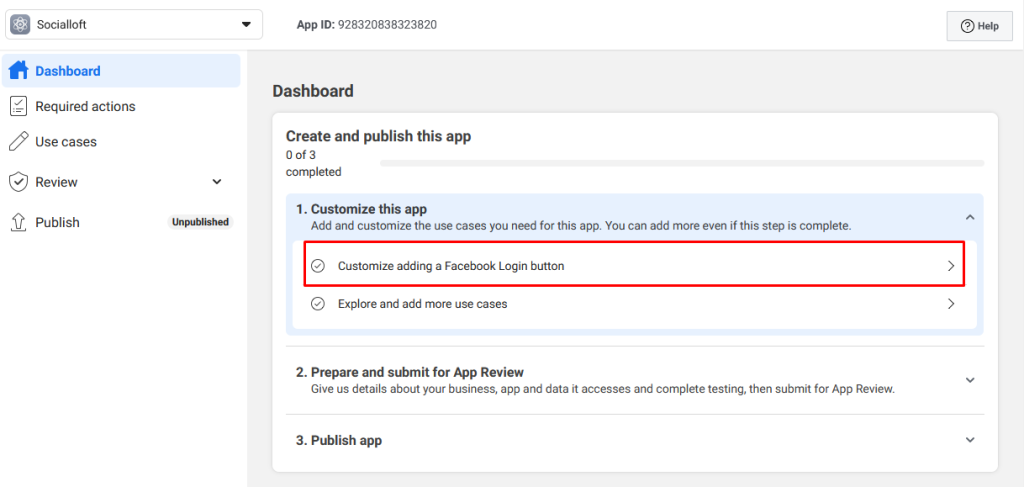
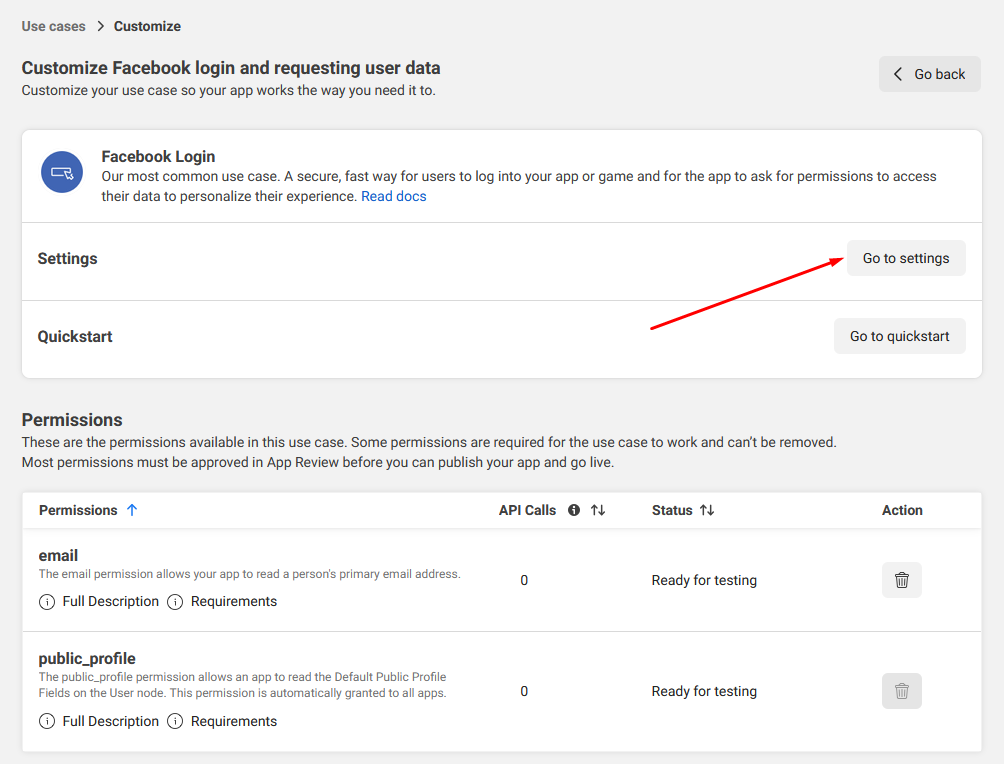
6/ At Dashboard, click on Customize adding a Facebook Login button
7/ Click on Go to settings button at Facebook Login
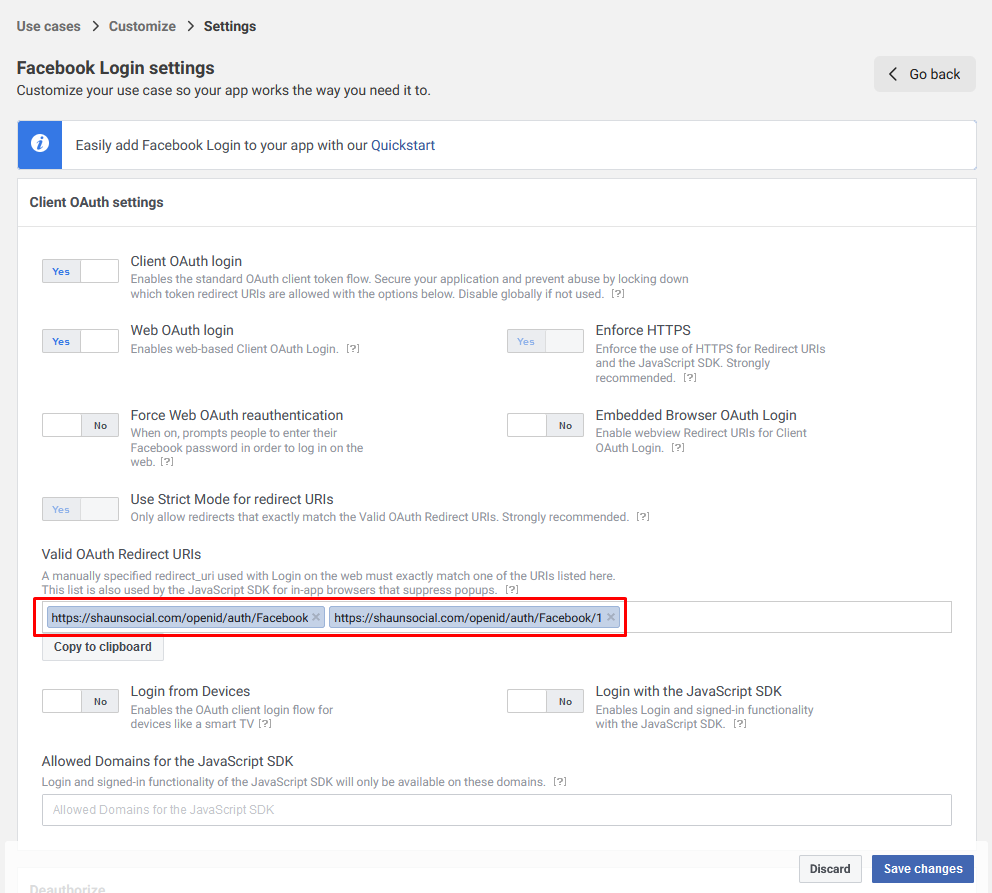
8/ You need to enter 2 Redirect URls as the format and click on Save changes button
- [yoursite]/openid/auth/Facebook
- [yoursite]/openid/auth/Facebook/1
Examples:
- https://shaunsocial.com/openid/auth/Facebook
- https://shaunsocial.com/openid/auth/Facebook/1
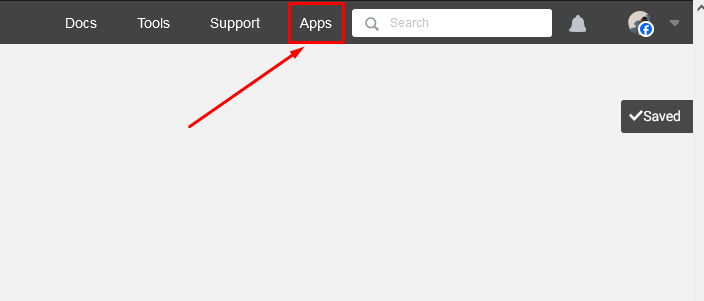
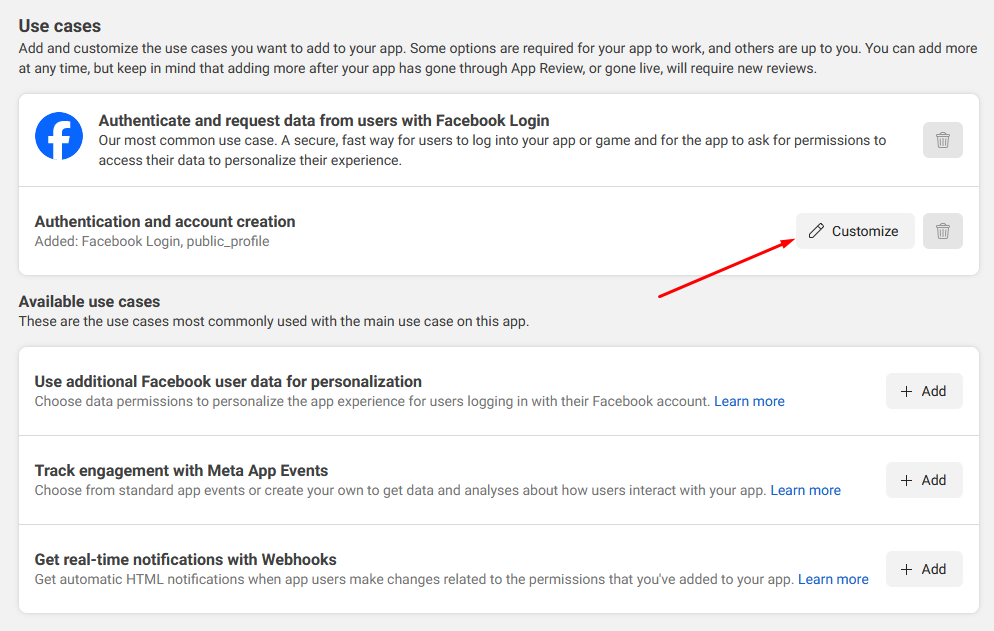
9/ Click on Apps menu and select your app
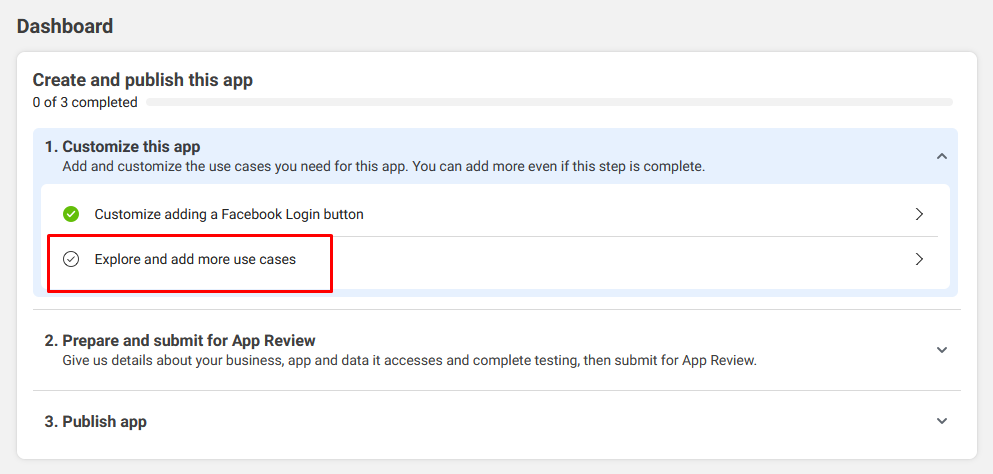
10/ Click on Explore and add more use cases
11/ Click on Customize button at Authentication and account creation
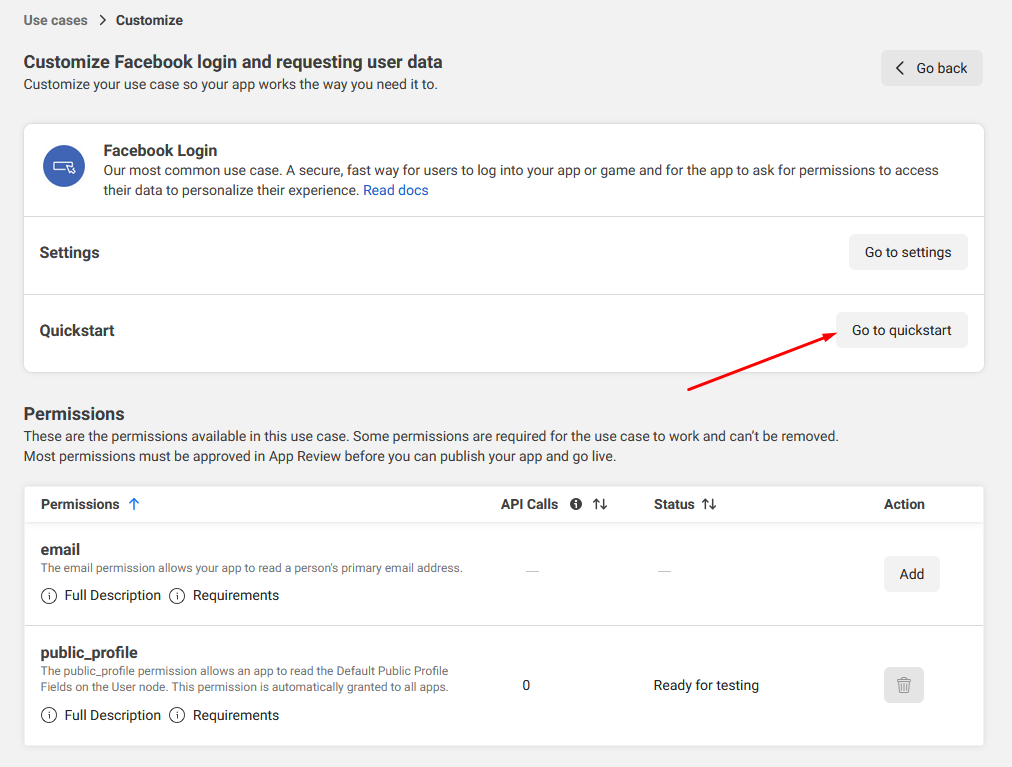
12/ Click on Go to quickstart button at Facebook Login
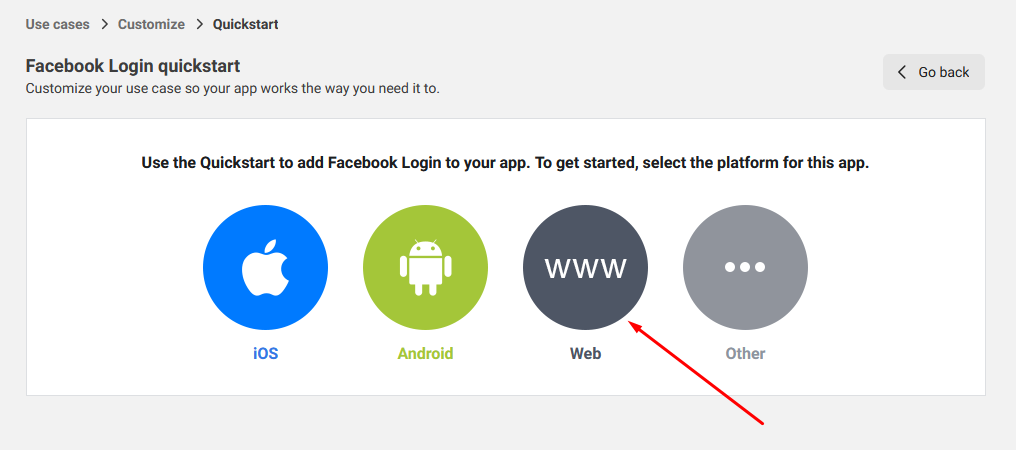
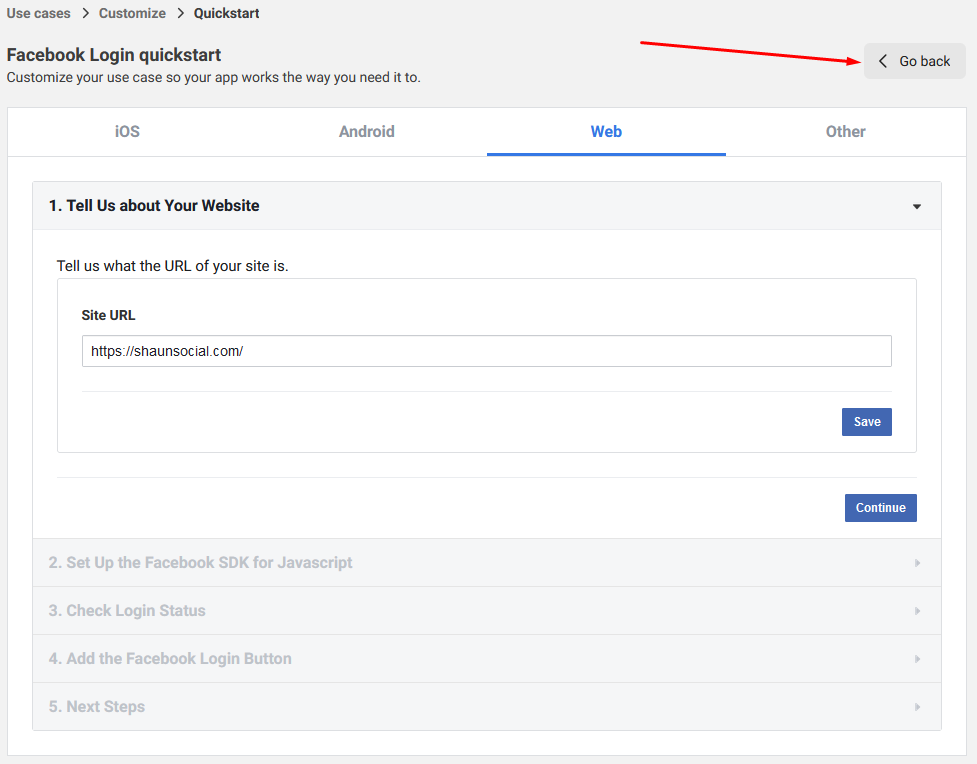
13/ Select Web platform
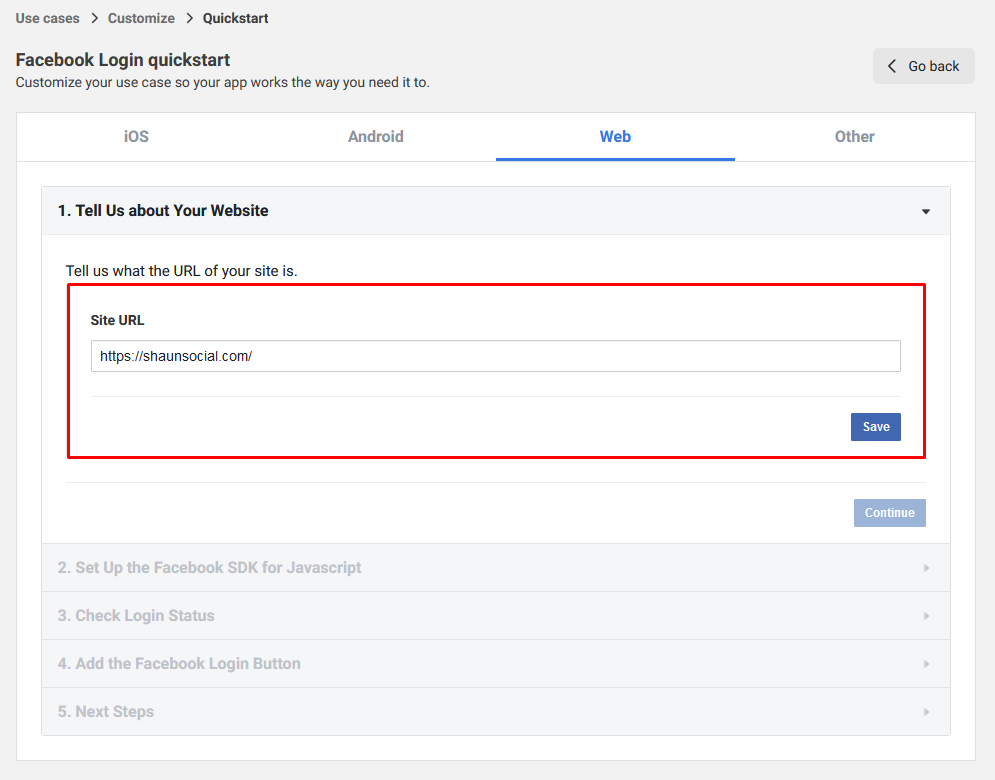
14/ Enter your site URL and click on Save button
15/ Click on Go back button
16/ Click on Add button for email permission
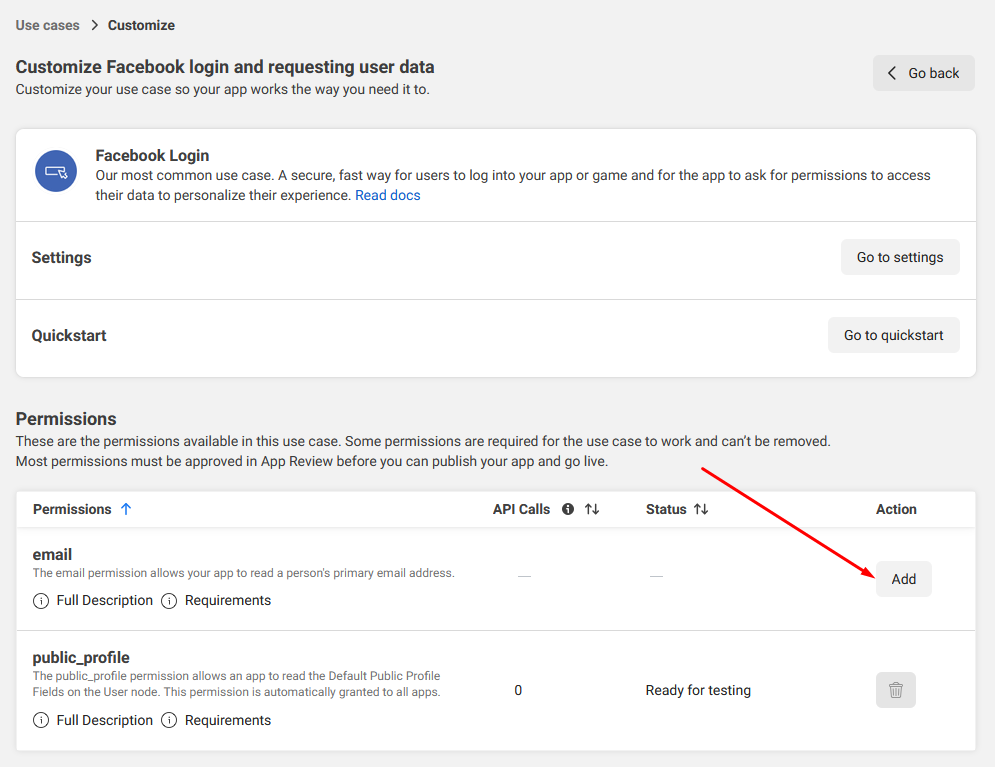
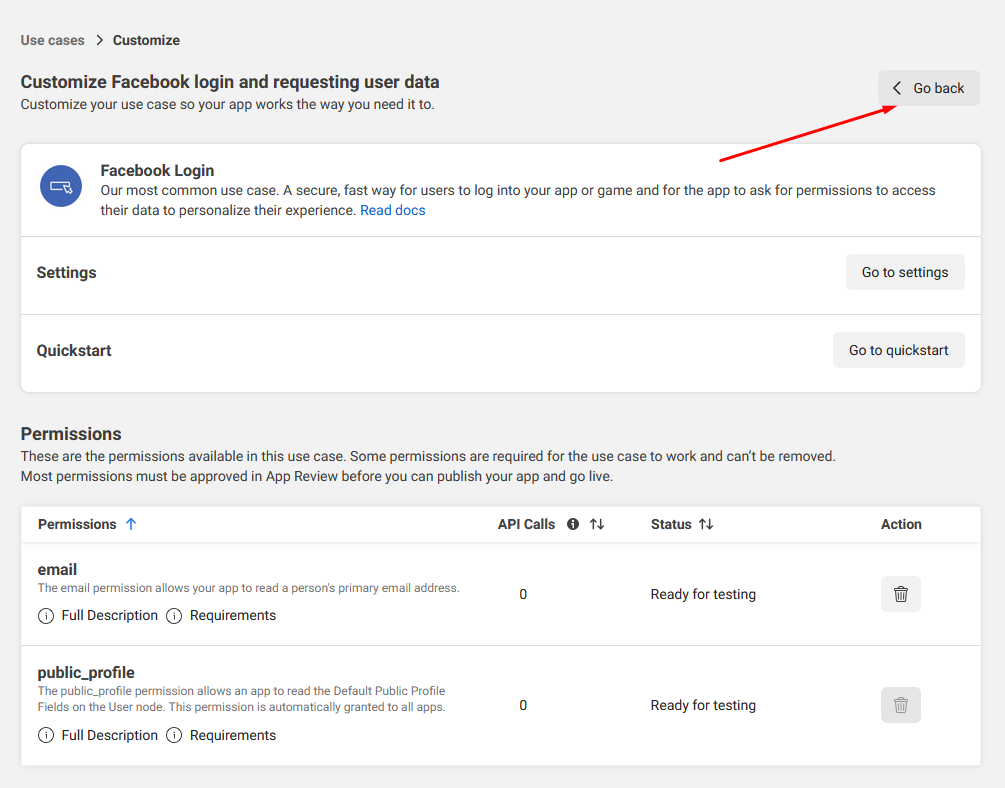
17/ Click on Go back button
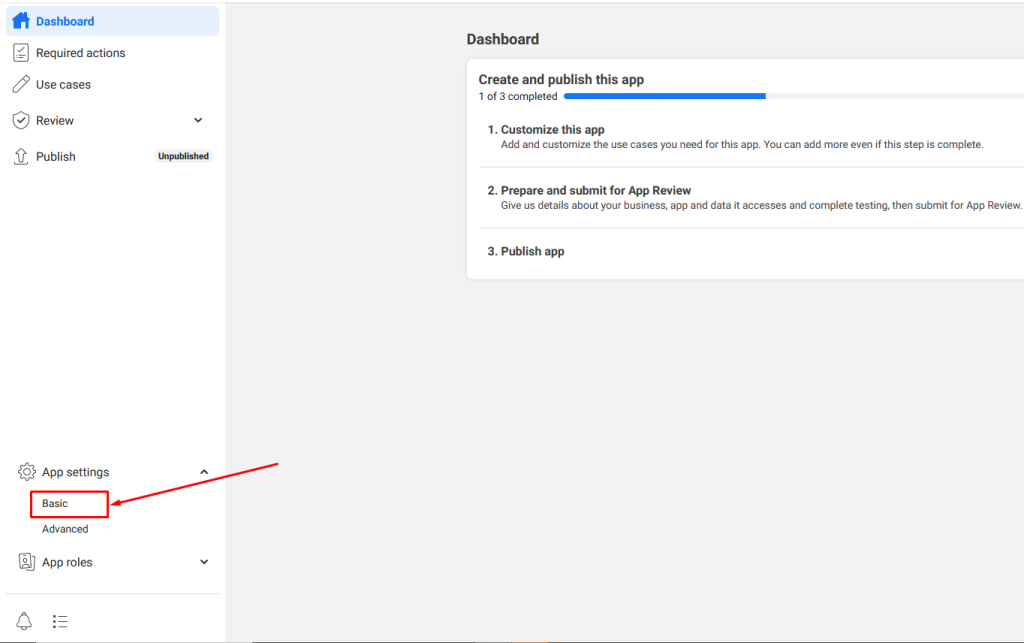
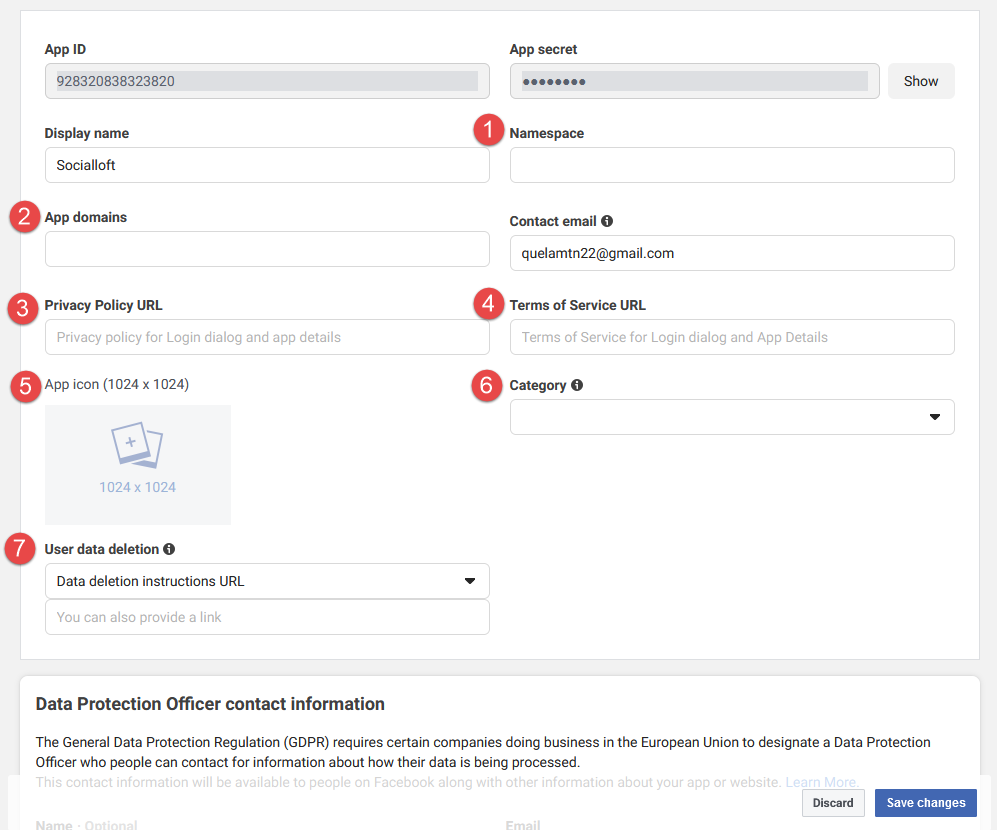
18/ At App settings, click on Basic
19/ Fill all information and click on Save changes button
- Namespace: enter your namespace
- App domains: enter your app domains
- Privacy Policy URL: enter your privacy policy url
- Terms of Service: enter your terms of service
- App icon: upload your app icon
- Category: choose your app category
- User data deletion: and enter url as format
“[yoursite]/openid/delete_user/Facebook”
20/ Open Publish menu and click on Start Verification to verify your business
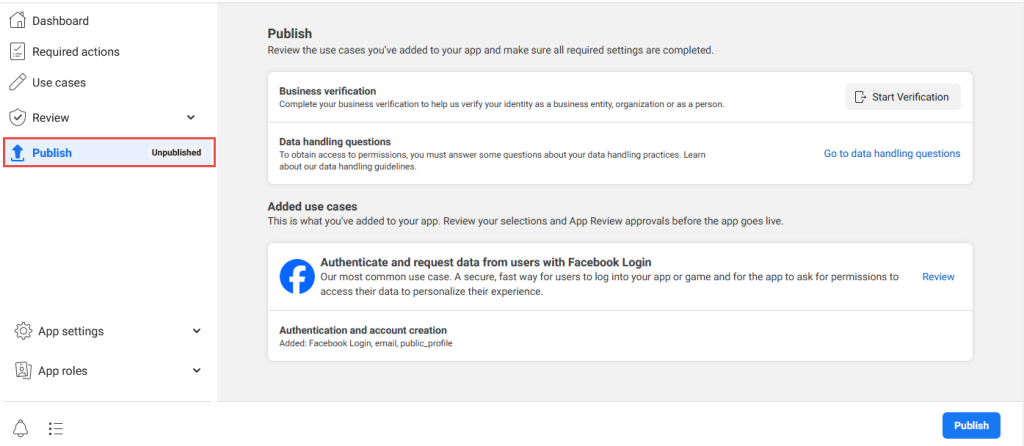
21/ After verify business successfully, open Publish menu again and click on Publish button to make your app live
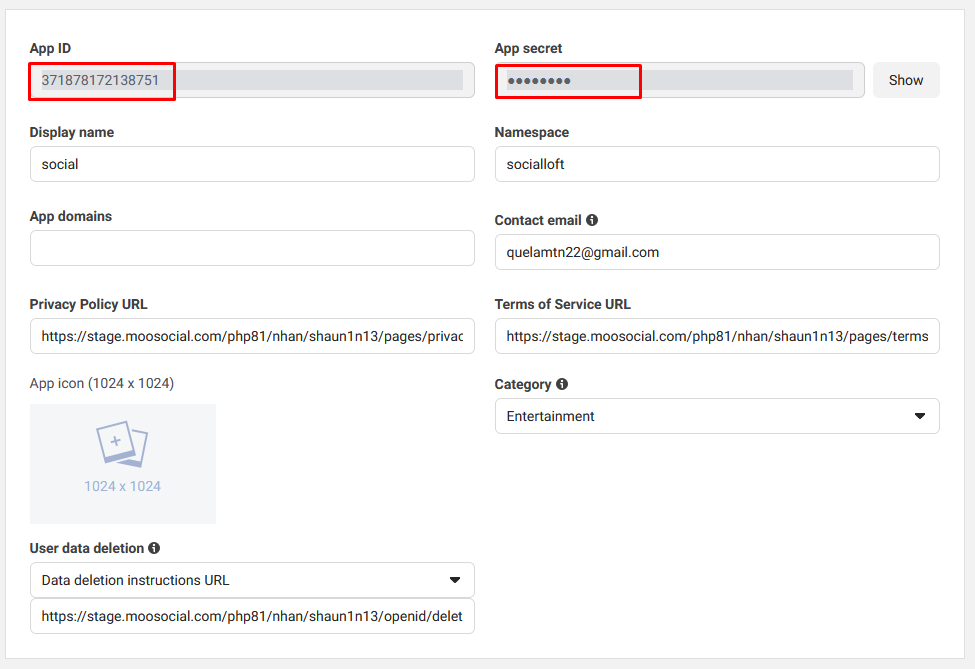
22/ At App settings, click on Basic
23/ Copy App ID and App secret here to paste to Open ID Manager at your site
*You dont need to config SDK version used in Admin Dashboard, system will be detected automatically.
*Remember to check if any space in the fields.
*Remember your site could be [https] instead of [http], they will not recognize if site was [https] and Client ID & Admin Dashboard were [http].
CONFIG GOOGLE
1/ Go to console.developers.google.com:
2/ Login your google account & create project:
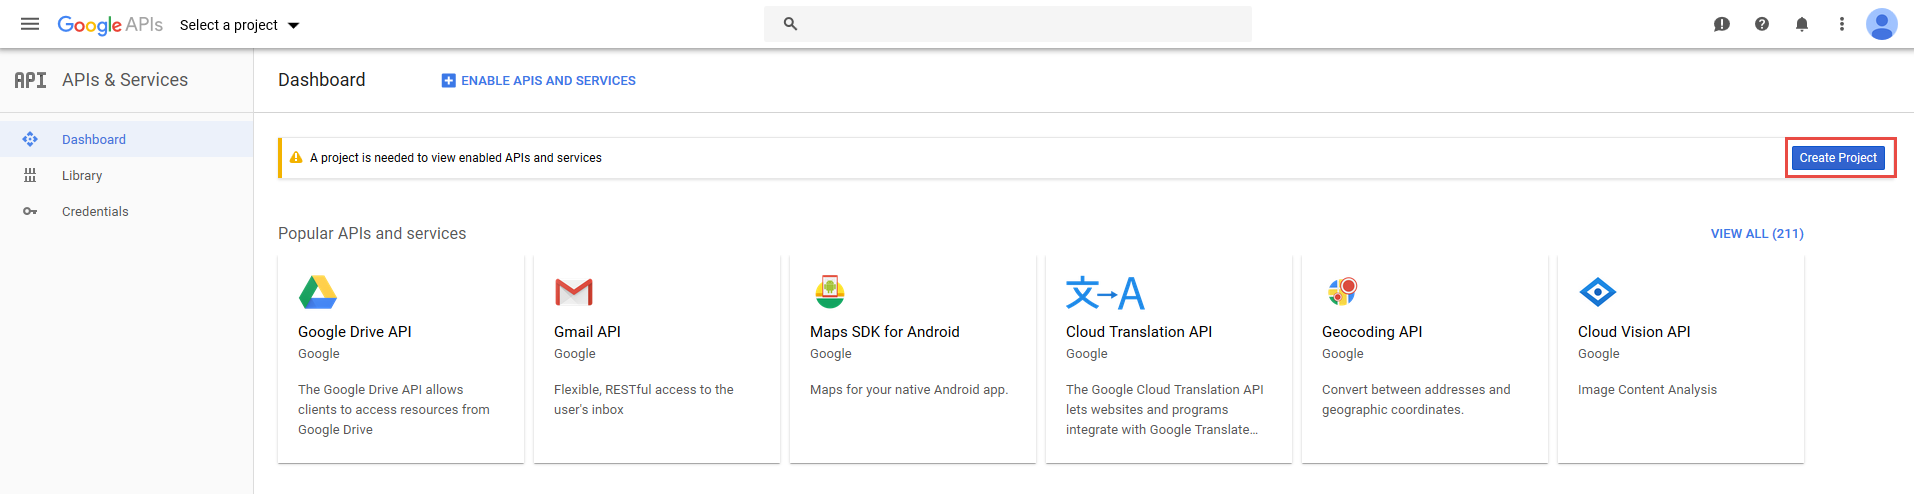
3/ Create new project:
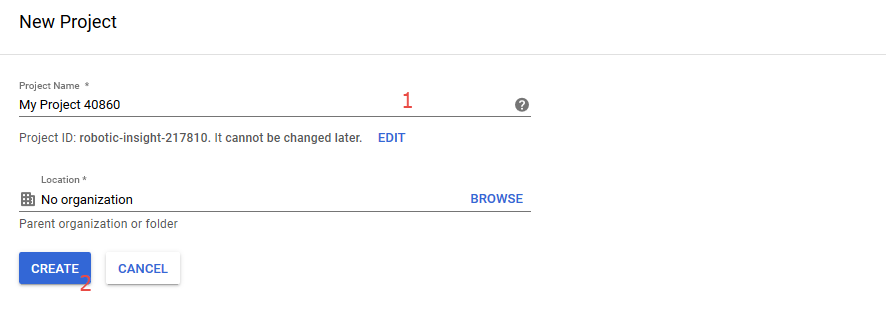
#1 Fill your project’s name
#2 Create
*Agree to Terms and Conditions if they’re showing up.
4/ After your project is done creating select your Project from select box and go to API & Services/Credentials of your project:
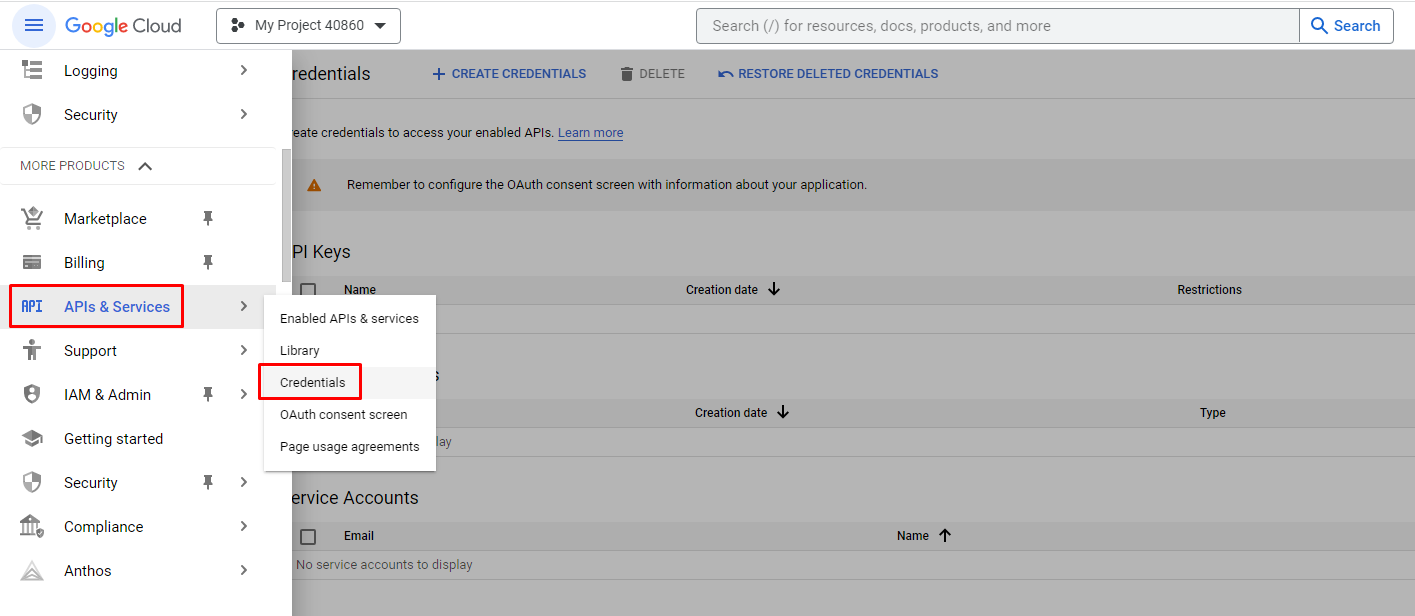
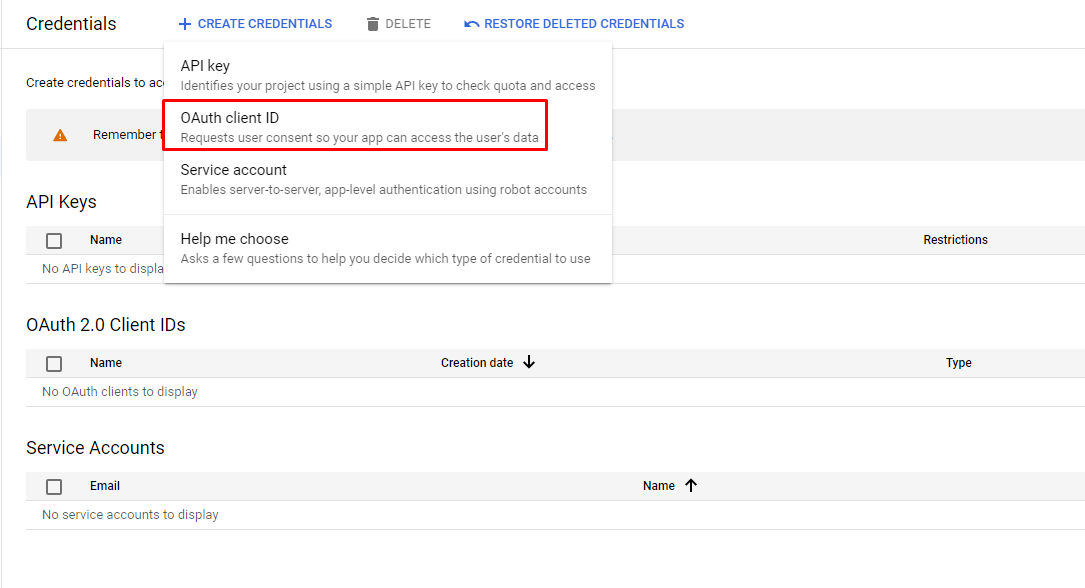
5/ Click on CREATE AREDENTIALS and choose OAuth client ID:
6/ We have to configure consent screen first:

#Press on Configure consent Screen then continue.
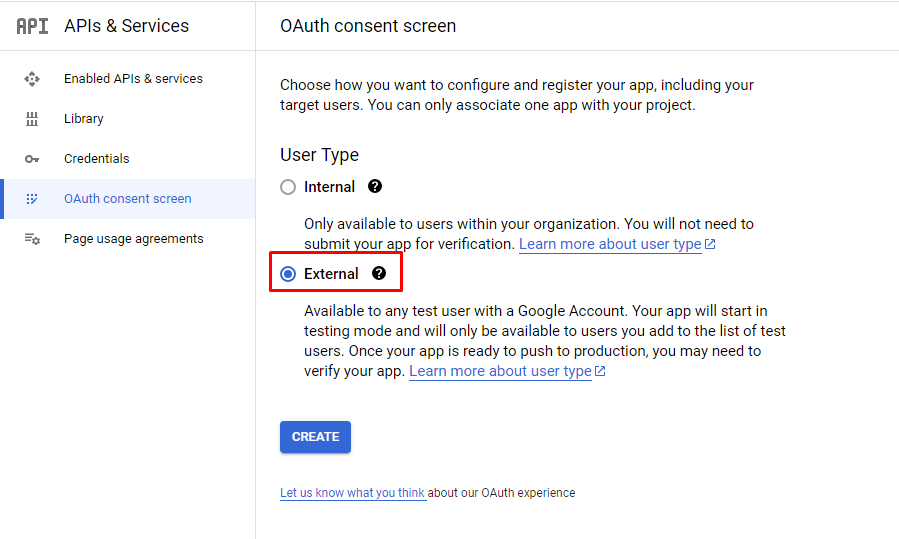
7/ Select External and click on CREATE button:
8/ Register at your OAuth Consent Screen :
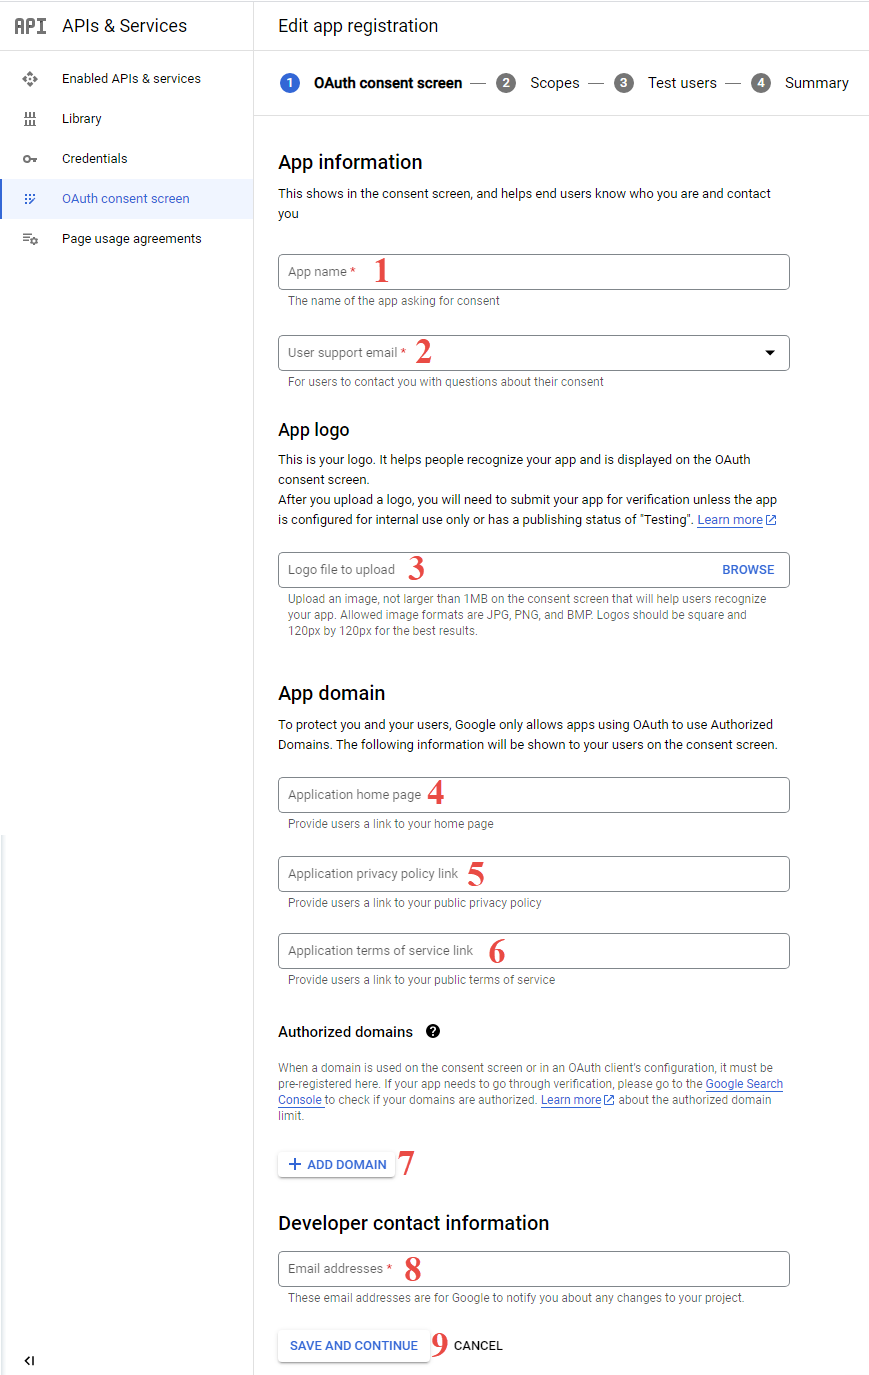
#1 Enter App name
#2 Enter User support email
#3 Upload logo
#4 Enter your home page link
#5 Enter your privacy policy page link
#6 Enter your terms of service page link
#7 Enter your domain
#8 Enter your developer contact email
#9 Save information
Do the step 4 and step 5 again to create OAuth client ID
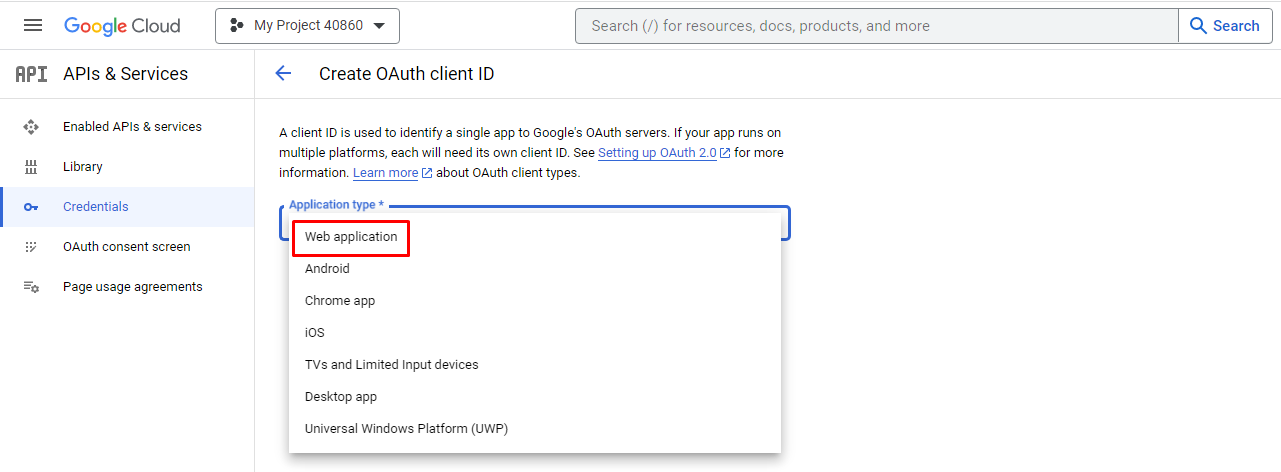
9/ Select Application type: Web application:
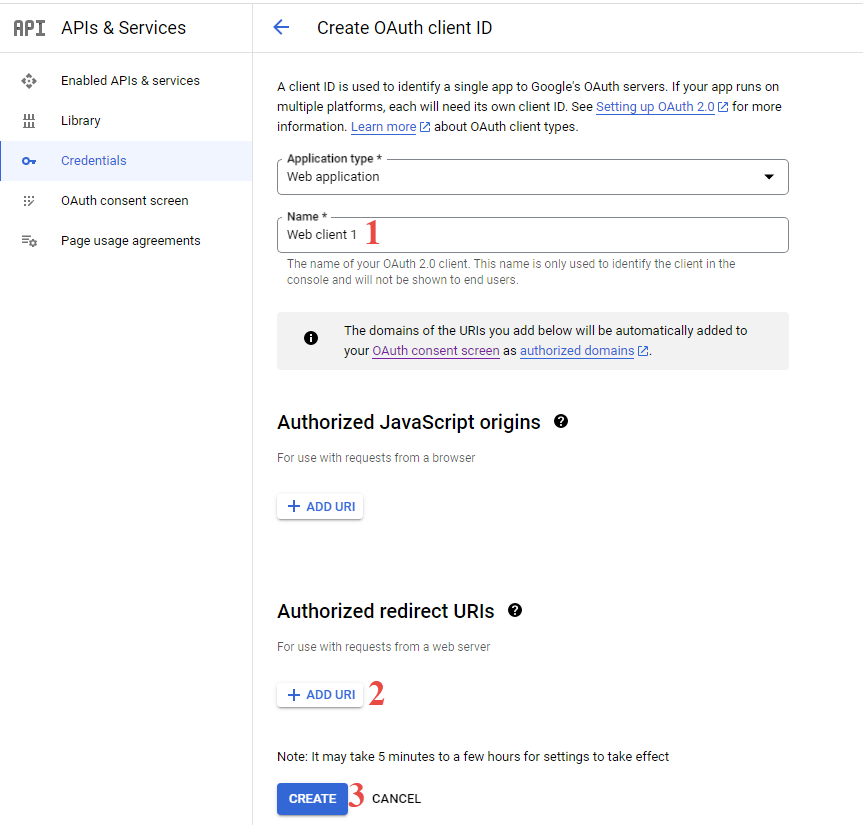
10/ Fill the OAuth client ID information:
#1 Enter the OAuth client name
#2 Enter 2 redirect URls as format:
- [yoursite]/openid/auth/Google
- [yoursite]/openid/auth/Google/1
Examples:
- https://shaunsocial.com/openid/auth/Google
- https://shaunsocial.com//openid/auth/Google/1
#3 Create OAuth Client ID
11/ Review and save your Client ID and Client Secret:
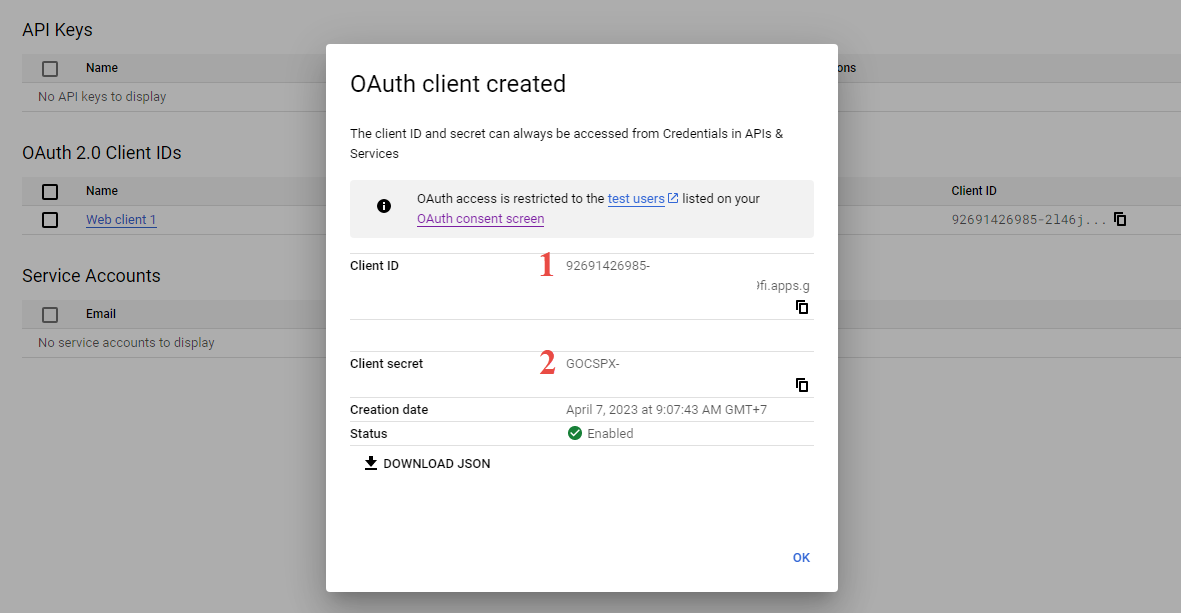
Copy (1) and (2) to your setting Site Settings/OpenID Manager/Google Login
*Remember to check if any space in the fields.
*Remember your site could be [https] instead of [http], they will not recognize if site was [https] and Client ID & Admin Dashboard were [http].
* Both sides, Admin Dashboard and Client ID must be configured synchronously for the 1, 2, they must be same to each others.
CONFIG TWITTER (X)
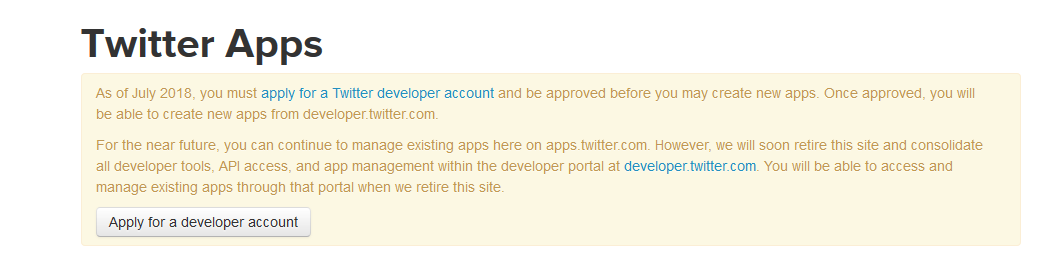
1. Go to https://developer.twitter.com/en/apps and login your Twitter developer account.
Note: if your account is not developer account, you will got a message request “Apply for a developer account”, please click “Apply for a developer account” and follow all steps to apply developer account.
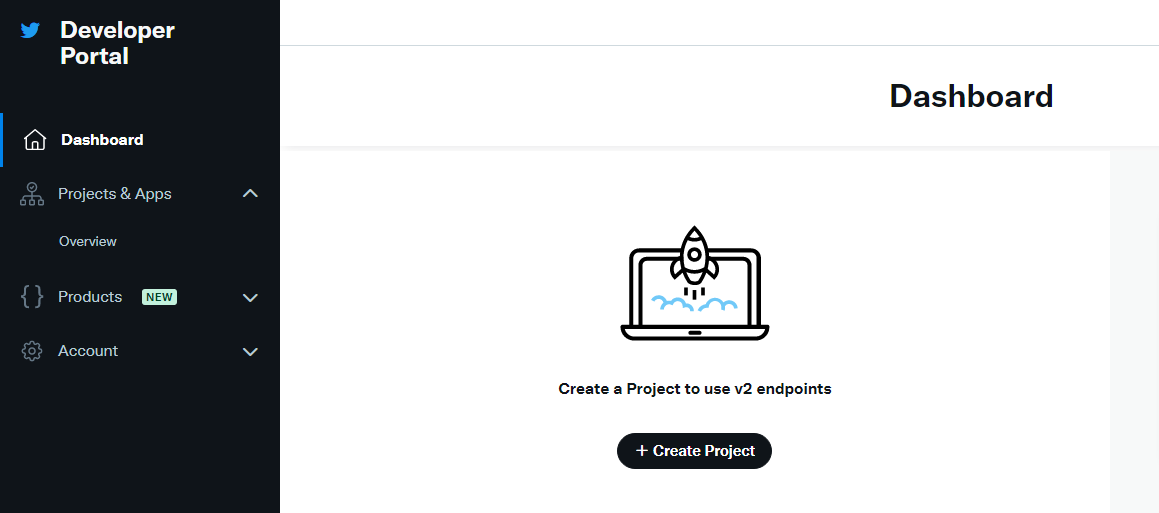
2. At Dashboard tab, click on Create Project button:
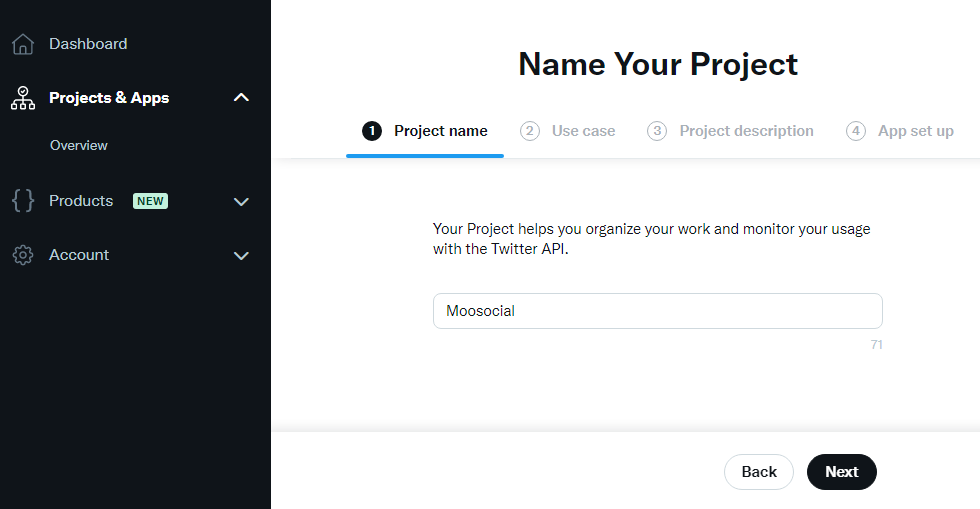
3. At Projects & Apps tab, you must fill all your project information:
3.1 Enter Project name and click on Next button.
3.2. Select a Use case and click on Next button.

3.3. Enter Project description and click on Next button.

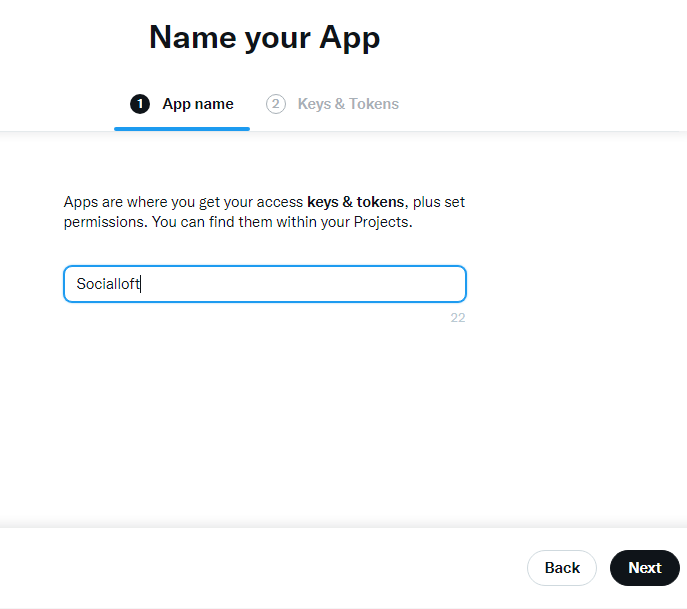
4. After create project successfully, you must enter your App name and click on Next button
5. Click on App settings
6. Click on Set up button
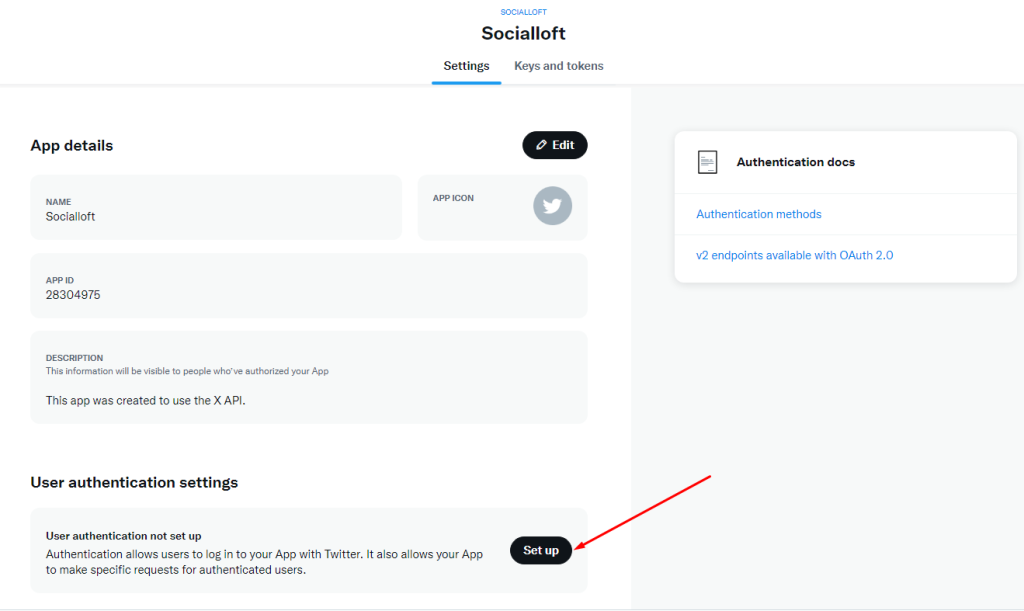
7. You have to fill all your app settings.
7.1 App permission: select Read and write and Direct message.

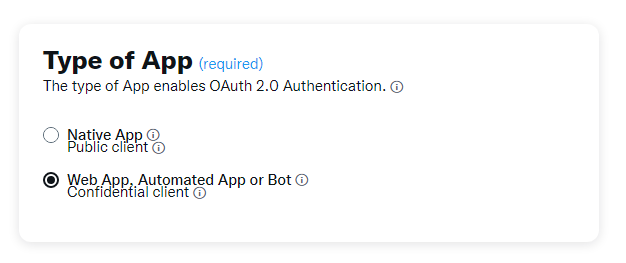
7.2. Type of App: select Web App, Automated App or Bot.
7.3 App info: enter app info and click on Save button.
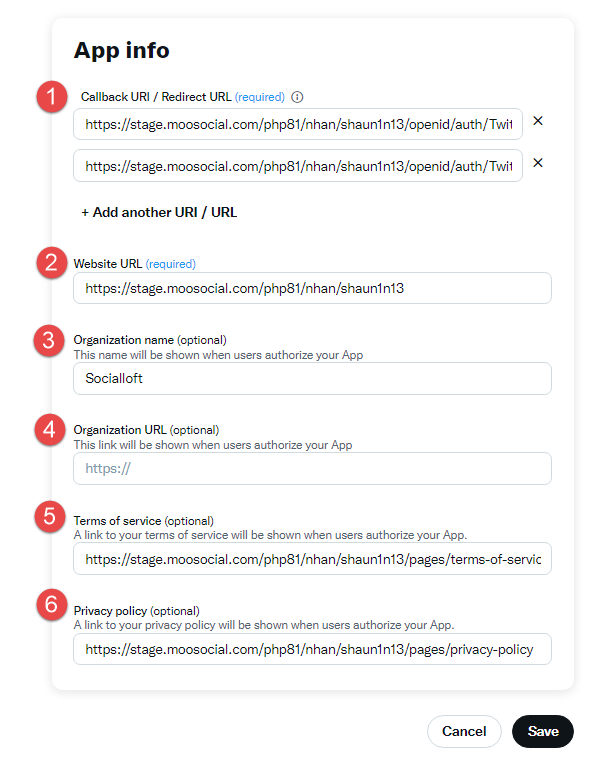
#1 Enter 2 redirect URls as format:
- [yoursite]/openid/auth/Twitter
- [yoursite]/openid/auth/Twitter/1
Examples:
- https://shaunsocial.com/openid/auth/Twitter
- https://shaunsocial.com//openid/auth/Twitter/1
#2. Enter your Website URL
#3. Enter your organization name. This is optional field.
#4. Enter your organization URL. This is optional field.
#5. Enter Terms of service url. This is optional field.
#6. Enter Privacy policy url. This is optional field.
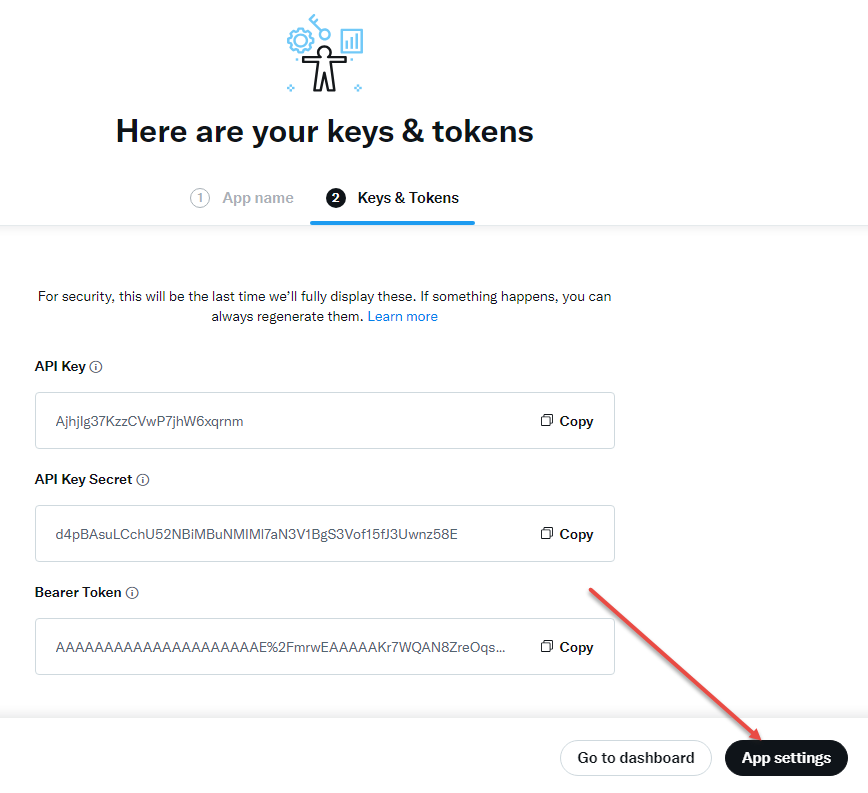
8/ Review and save your Client ID and Client Secret:
Copy (1) and (2) to your setting Site Settings/OpenID Manager/Twitter Login:
CONFIG LINKEDLIN
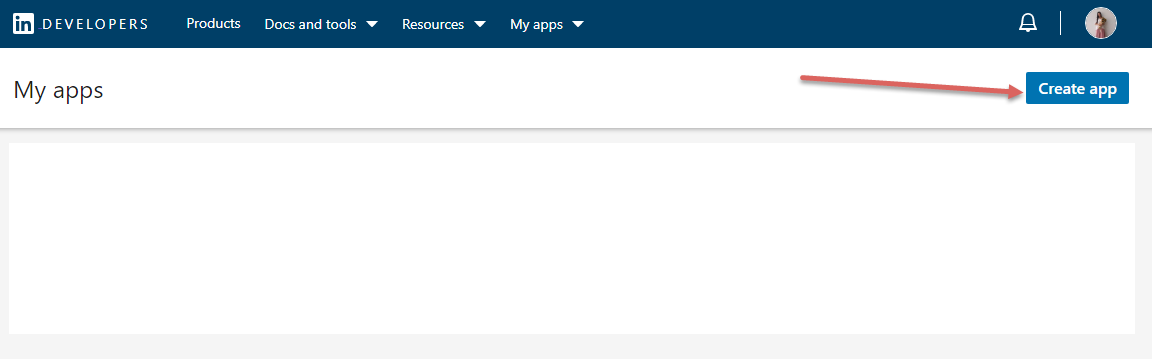
1. Go to https://www.linkedin.com/developers/
2. Login –> Create app:
3. Complete information about your app:
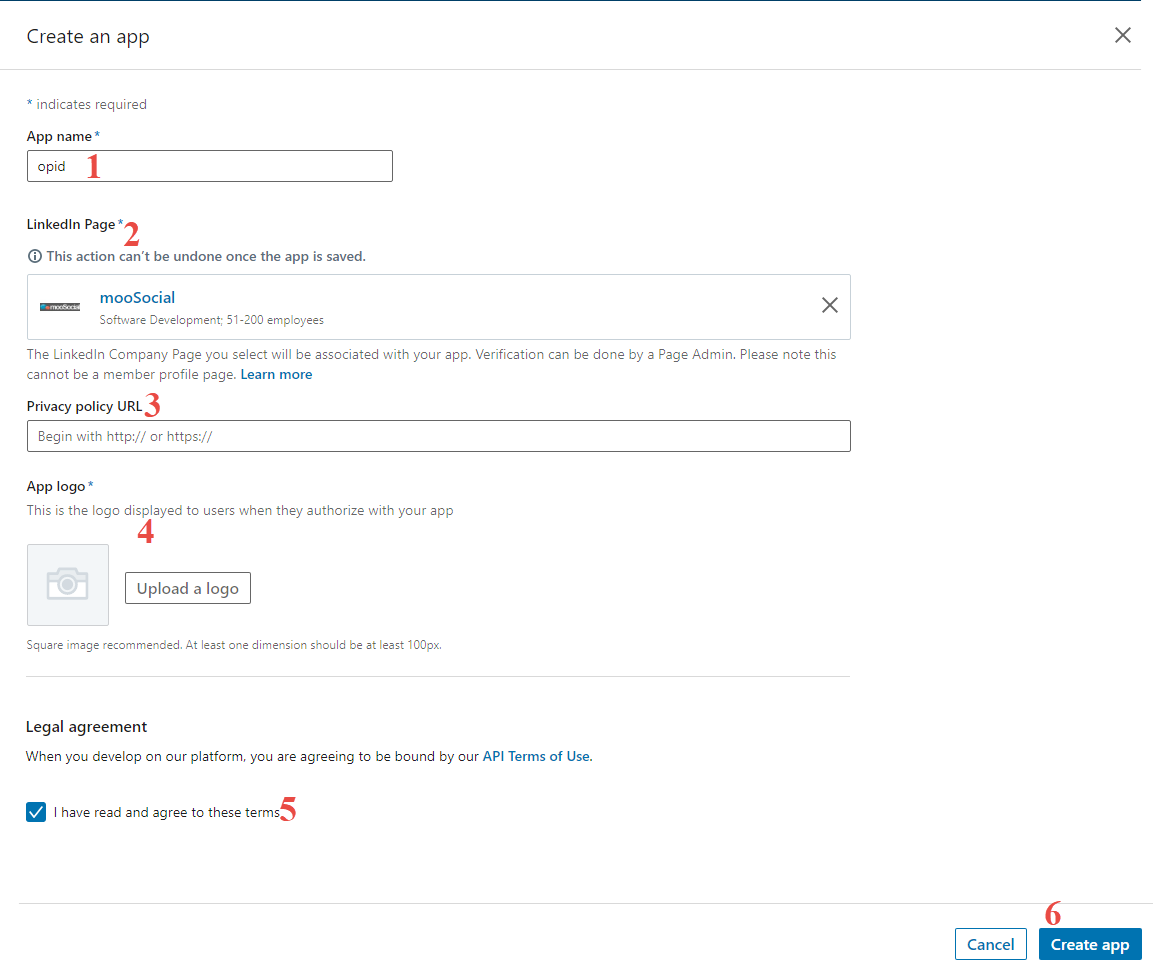
#1 Enter your app name
#2 Select your company linkedlin page
#3 Enter your privacy poicy page link
#4 Upload your logo
#5 Tick on I have read and agree to these terms check box
#6 Create app
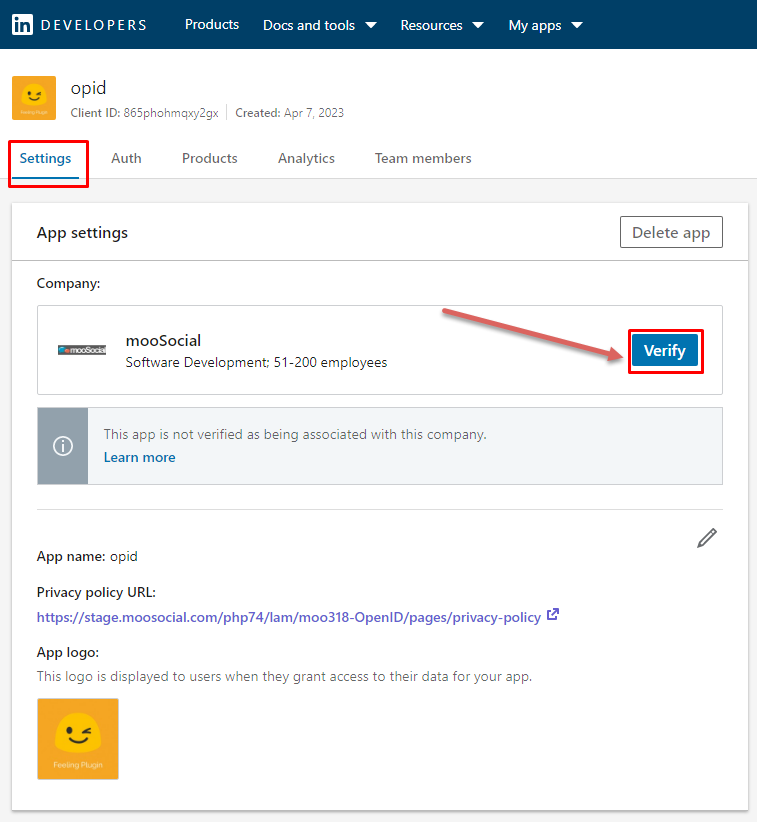
4. Verify your app:
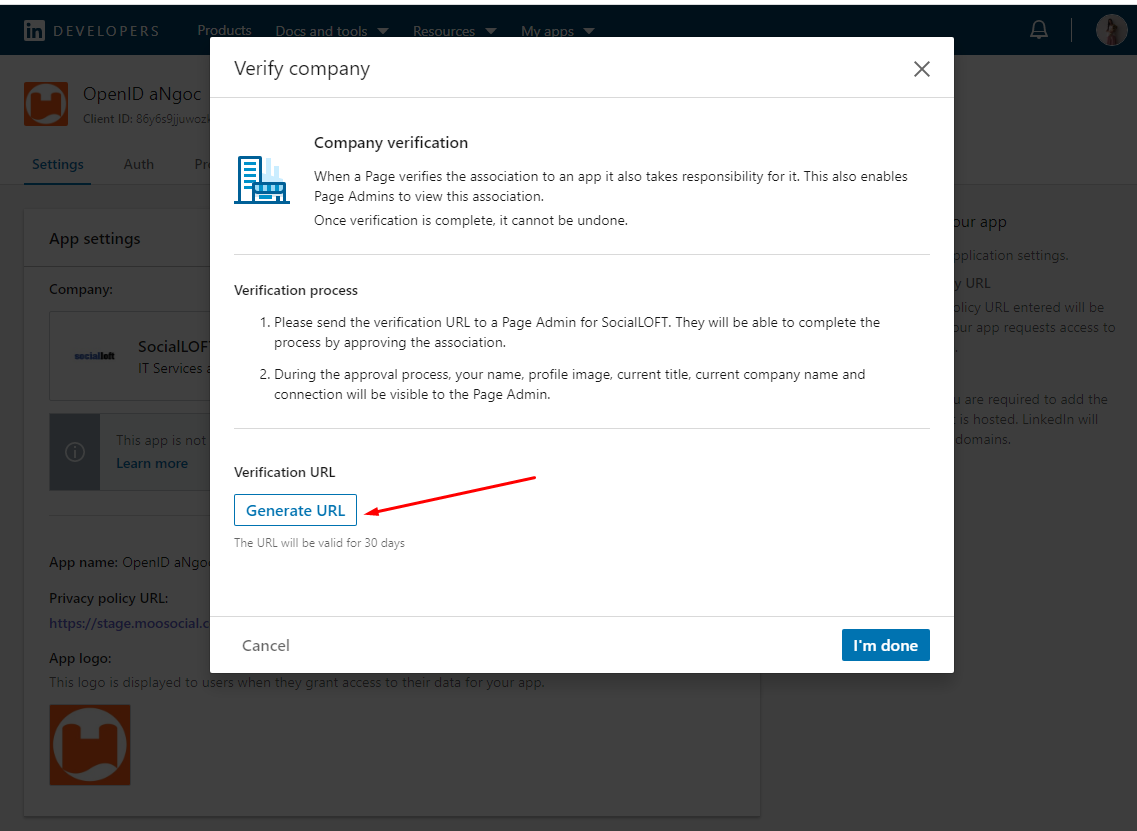
4.1/ Go to Settings tab, click on Verify button:
4.2/ At Verify company popup, click on Generate URL to get Verification URL:
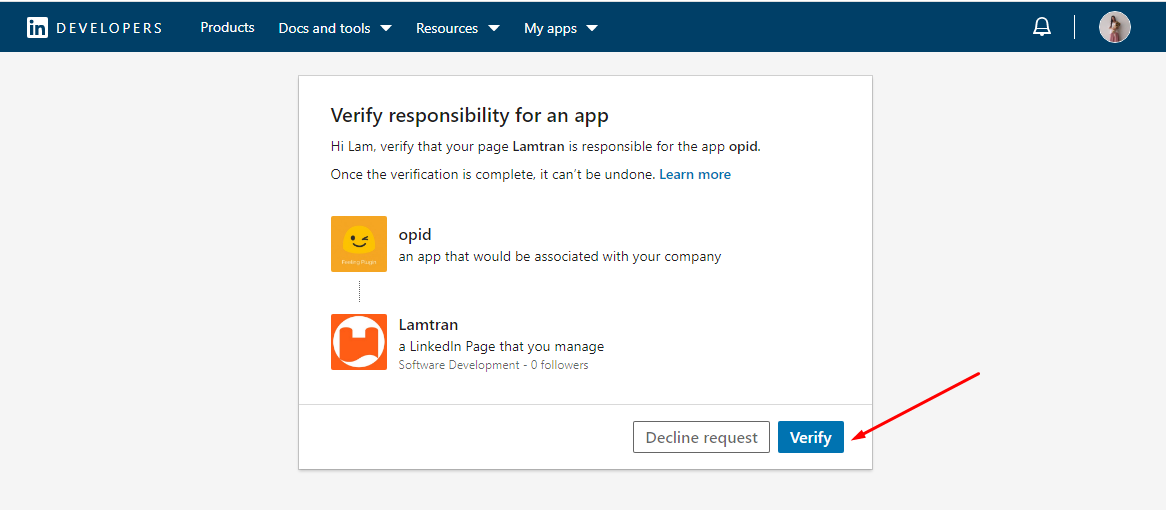
4.3/ Open Verification URL and click on Verify button:
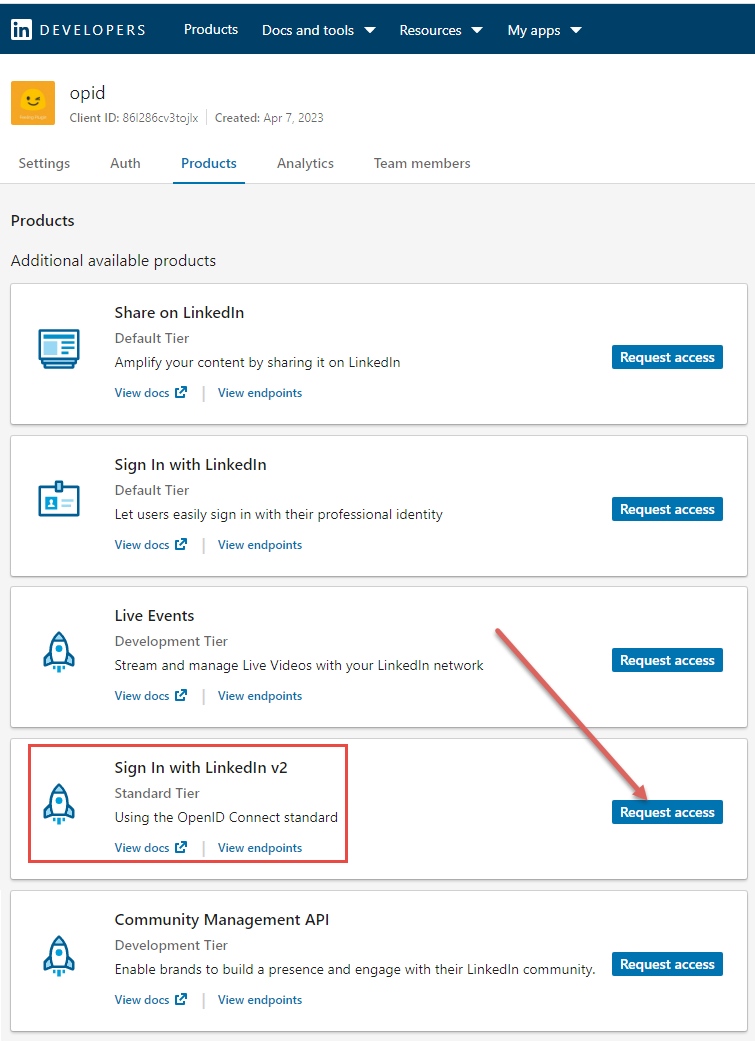
5. After verify your app, open Products tab and click on Request access for Sign In with LinkedIn v2:
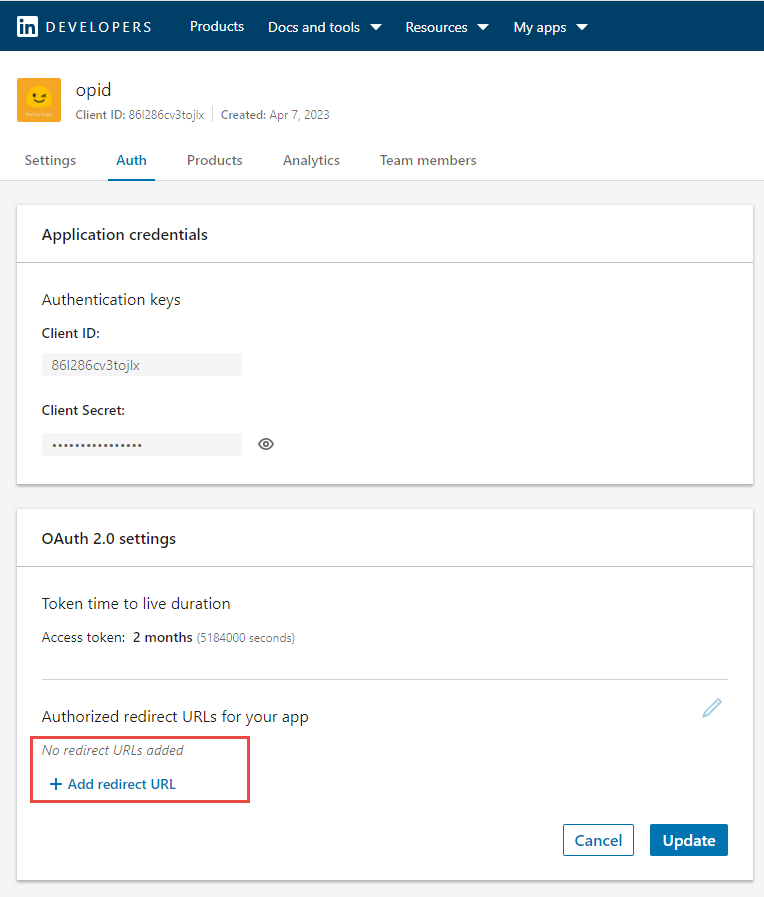
6. Open Auth tab, Add 2 redirect URLs and click on Update button:
Your redirect URL has the format:
- [yoursite]/openid/auth/Linkedin
- [yoursite]/openid/auth/Linkedin/1
Examples:
- https://stage.moosocial.com/php81/nhan/shaun1n13/openid/auth/Linkedin
- https://stage.moosocial.com/php81/nhan/shaun1n13/openid/auth/Linkedin/1
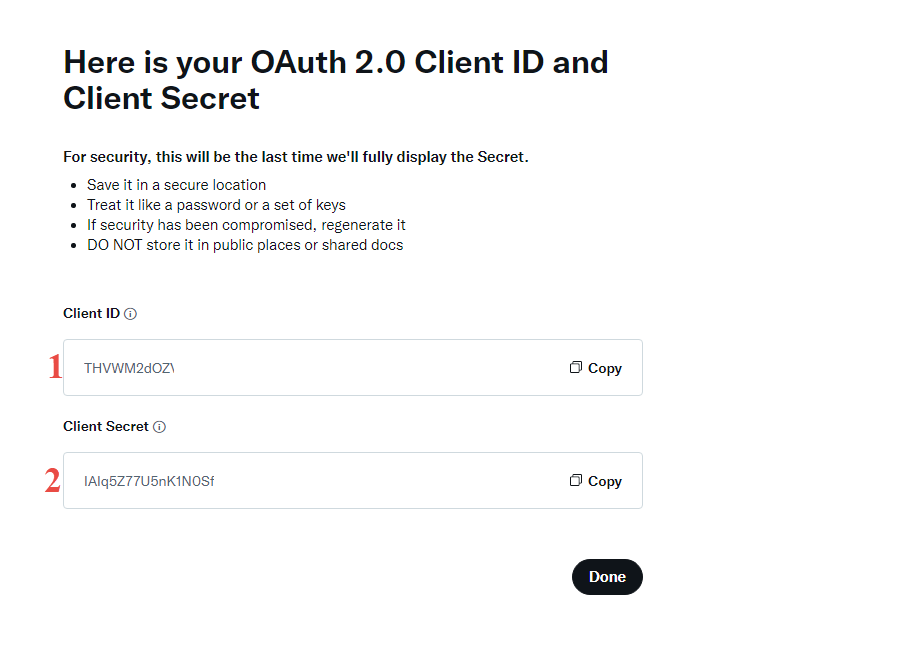
7. You can view and copy your Client ID and Client Secret:
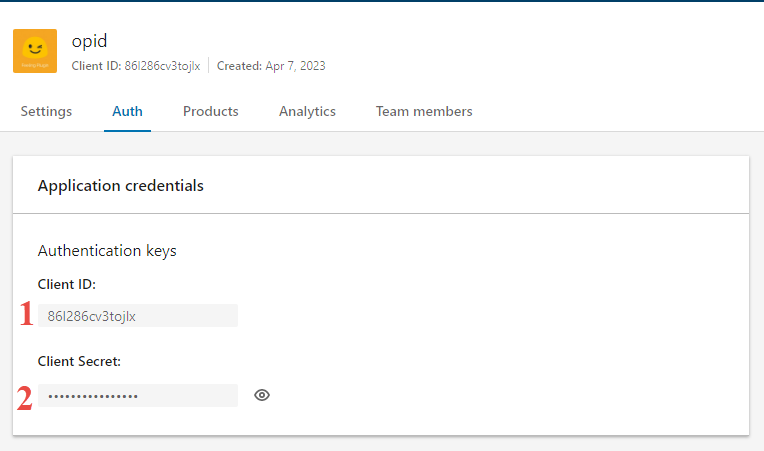
And use that Client ID and Client Secret at your setting Site Settings/OpenID Manager/Linkedin


