ShaunSocial user guide 1.5.6 / AdminCP
Login, security and identity
This page covers everything about signing in to your site: sign-in with Facebook, Google and other accounts, letting other sites sign people in with accounts from your site, two-factor authentication, passkeys, the SMS service behind phone codes, phone verification, and the password and lockout rules.
This site as an OpenID provider (OpenID clients)#
Last updated: 2026-11-17 · v1.5.6
The other way round: your site can be the provider, so that people sign in to another website with the account they
have on your site. The other website is called a client. A typical use is connecting two ShaunSocial
sites. In the example below Site A (https://site-a.example.com) is your site, where people have their
accounts, and Site B (https://site-b.example.com) shows a "sign in with Site A" button.
Connect two ShaunSocial sites#
- Choose an app name for Site A without spaces, for example
SiteA. You enter it on Site B, and it is part of the addresses in the next step. - On Site A, open AdminCP → Site Settings → Manage OpenID Clients and click Create new. Fill in:
Both redirect addresses must be on the same domain as the App URL. Click Generate Credentials: a Client ID and a Client Secret appear, each with a Copy button (Download JSON saves them as a file). Below them the screen lists Site A's addresses (Authorization Endpoint, Token Endpoint, User Information Endpoint). Switch Active on and click Submit.
Field Example App Name Site BApp URL https://site-b.example.comRedirect URI https://site-b.example.com/openid/auth/SiteAApp Redirect URI https://site-b.example.com/openid/auth/SiteA/1What you should see: "OpenID client has been created." and the client in the list.
- On Site B, open AdminCP → Site Settings → Manage OpenID, click Create new and fill in:
Switch Active on and click Submit.
Field Value Name Site AApp name SiteA(exactly as in step 1, same capital letters)Logo Site A's logo Server https://site-a.example.com(no/at the end)Client ID, Client secret the two values from step 2 Scope leave empty Authorize endpoint https://site-a.example.com/oauth/authorizeAccess token endpoint https://site-a.example.com/oauth/tokenGet UserInfo endpoint https://site-a.example.com/api/users/openid_infoUser ID map, Email map, Name map, Avatar map id,email,name,avatar - Make sure User registration is on at Site B (AdminCP → Site Settings → General Configuration → Login & Registration); otherwise people from Site A who have no account on Site B yet cannot get in.
- Test it: open Site B's sign-in page in a private window, click Site A's logo and sign in with a Site A account.
What you should see: you come back to Site B, signed in. If you were not signed in at Site A, Site A asks you to sign in first.
These steps have not yet been tried between two live sites.
Managing clients#
- Switch a client's Active off to stop it at once: sign-in from that website then fails until you switch it on again. Delete removes it for good.
- Generate new credentials if a client secret has leaked, and enter the new values on the other website.
- For a client that is not a ShaunSocial site, give its administrator the addresses shown under the credentials. Members' ID, name, e-mail and picture are shared with the client when they sign in.
Two-factor authentication#
Last updated: 2026-11-17 · v1.5.6
With two-factor authentication (2FA), signing in needs the password and a second, one-time code. Members choose for themselves whether to use it. You decide whether it is offered and which kinds of code are available.
Offer two-factor authentication#
- Open AdminCP → Site Settings → General Configuration → Login & Registration and tick Two-factor authentication (2FA). It is off after installing.
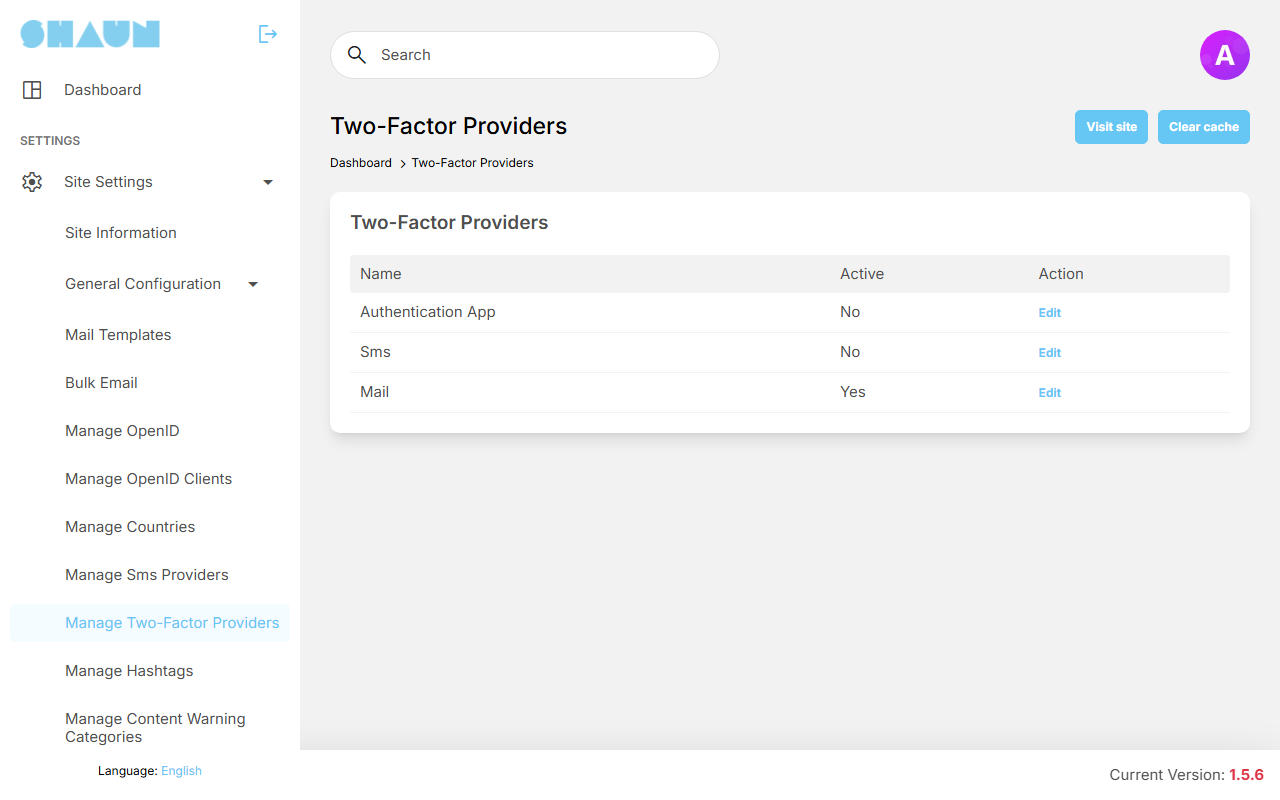
- Open AdminCP → Site Settings → Manage Two-Factor Providers. Three kinds of code are listed:
Provider After installing How the member gets the code Authentication App inactive from an app such as Authy, 1Password, Microsoft Authenticator or Google Authenticator Sms inactive by text message; needs a working SMS provider Mail active by e-mail; needs working e-mail (see An outgoing mail account) - Click Edit on a provider, switch Active on or off and click Submit. Name and Description cannot be edited, but their Translate links let you translate them for your other languages. Keep at least one provider active. Switching a provider off only stops members from choosing it from now on; members who already use it keep it.
What members see#
- Settings gets a Two-factor authentication tab (not for business pages). The member switches it on, enters their password, chooses a method and confirms it: an authentication app by scanning a QR code and entering the 6-digit code, SMS by entering a phone number and the code sent to it, Mail by entering the code sent by e-mail.
- From then on, after the password, the sign-in asks for a code from the chosen method.
- Signing in with a passkey (see Passkey login) or with a social login (see Social login) does not ask for the code.
- If you untick Two-factor authentication (2FA) later, members sign in without the code; their method is kept and is asked for again when you switch it back on.
When a member loses their phone#
A member who can no longer get codes cannot sign in. You can remove their two-factor setting:
- Open AdminCP → Users → Manage Users and find the member.
- Click Remove 2FA in their row (it appears only for members who use two-factor authentication) and confirm
"Do you want to remove two-factor authentication for this user?".
What you should see: "The two-factor of user have been removed." The member can now sign in with the password alone and set up 2FA again.
Make sure the request really comes from the account's owner before you do this.
Passkey login#
Last updated: 2026-11-17 · v1.5.6
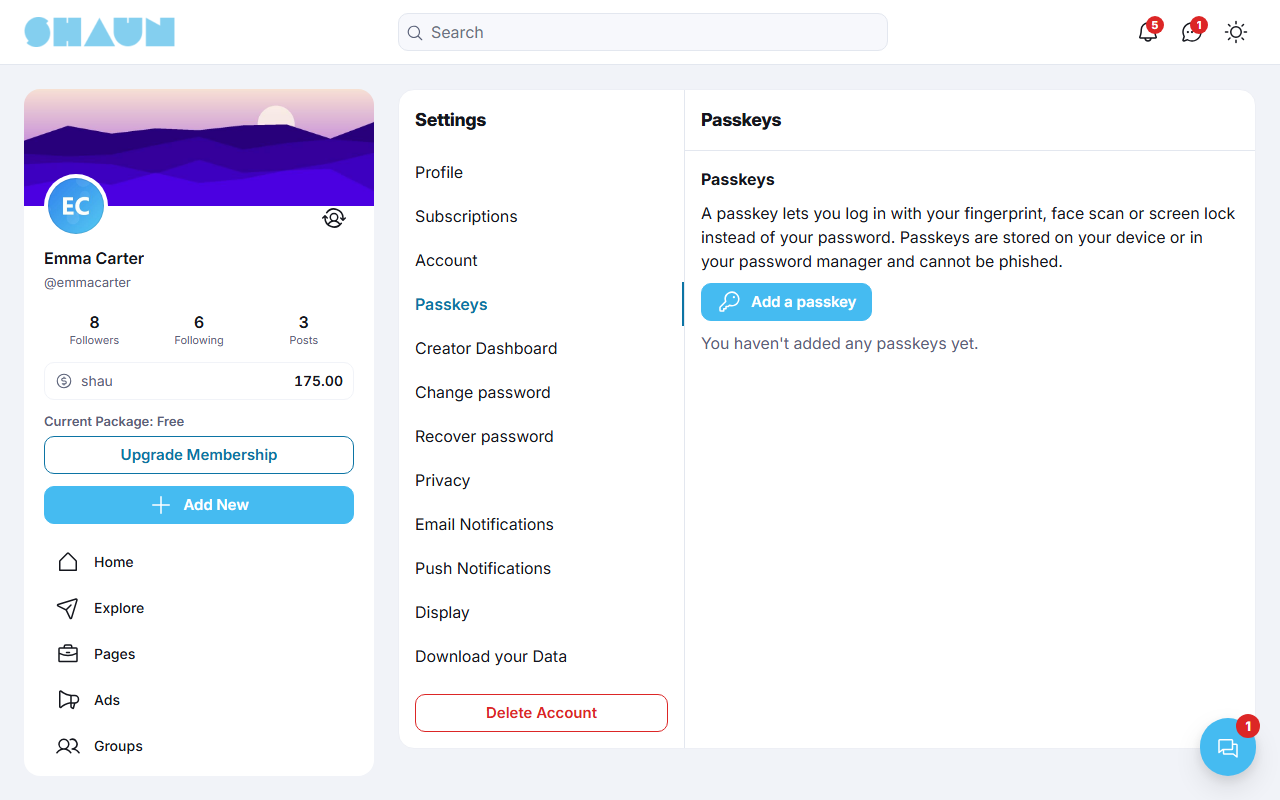
A passkey lets a member sign in with their fingerprint, face scan or the screen lock of their device instead of typing a password. The passkey is kept on the device or in the member's password manager, and it cannot be stolen by a fake sign-in page. Passkey login is on after installing.
- Requirements: the website only (not the mobile apps), served over HTTPS, in a browser that supports passkeys.
- Adding one: members open Settings → Passkeys, click Add a passkey, enter their password and follow their device's prompt; "Your passkey has been added." confirms it. The list shows when each passkey was added and last used, with Remove. The tab is shown to accounts that have an e-mail address and password (not to business pages).
- Signing in: the sign-in page shows Log in with a passkey in browsers that support it. No two-factor code is asked: the fingerprint, face or screen lock already proves who it is.
- Your domain: passkeys belong to the domain in Site url. If you move the site to another domain, existing passkeys stop working and members add new ones.
- Switching it off: untick Passkey login; the button and the Settings tab disappear and members sign in with their password.
SMS providers (Twilio, Clickatell)#
Last updated: 2026-11-17 · v1.5.6
Your site sends text messages through an SMS service you sign up with: Twilio or Clickatell. Text messages carry the codes for phone verification, for two-factor authentication by SMS and for changing a phone number in Settings. The service charges you per message.
The list shows both services; the one marked Default (Twilio after installing) sends every message.
Set up a service#
- Create an account with Twilio or Clickatell and get the details below from its dashboard.
- Click Edit on the service and fill in:
Service Fields Twilio Sid (Account SID), Token (Auth Token) and From (the Twilio phone number messages are sent from) Clickatell Api key - To make this service the one that sends messages, switch Default on. (The current default cannot be switched
off; switch another service on instead.) Click Save Changes.
What you should see: "Your changes have been saved."
- Click Test on the service's row, choose the country and enter your own phone number, and click
Submit.
What you should see: "The text message sent successfully." and a text message "Test" on your phone. Otherwise the service's error message is shown; check the details and your account balance with the service.
The site connects to the SMS service over HTTPS from the server. If the edit screen shows "Warning: open_basedir
restriction is in effect", PHP's open_basedir setting may stop that; relax it for the site.
Phone verification at sign-up#
Last updated: 2026-11-17 · v1.5.6
With Phone verification signup step ticked (off after installing), every new member must confirm a mobile phone number by SMS before using your site. It helps against fake accounts, since each phone number can belong to one account only.
- Set up and test an SMS service first (see SMS providers). Without it nobody can finish signing up.
- Tick Phone verification signup step.
- Optionally tick Enable reCAPTCHA in send sms under Spam & Banning Tools, so robots cannot make your site send text messages (see Captcha).
- Sign up with a test account in a private window.
What you should see: the sign-up form asks for a phone number; after signing up, a screen asks you to Enter verification code sent by SMS.
What members see#
- The sign-up form has a Phone Number field with a country picker. A number that is already used is refused: "The phone number already exists."
- After signing up, the member enters the code from the text message. The code expires after 2 minutes; Resend code sends a new one and Re-enter phone number corrects the number. Until it is confirmed, the site shows only this screen. If e-mail validation is also on, the e-mail code comes first.
- Members can then sign in with their e-mail, user name or phone number, and change the number in Settings → Account (with a new code).
- The step applies to accounts created while it is on, including accounts created through social login. Members who signed up before you switched it on are not asked.
- If a member cannot receive the text message (for example because the SMS service fails), you can confirm the number for them: in AdminCP → Users → Manage Users click Verify phone in their row and confirm. Unverify phone does the opposite and makes the member confirm a number again. Both links appear only while phone verification is on.
Password policy and login lockout#
Last updated: 2026-11-17 · v1.5.6
Password rules#
A password always needs at least 6 characters. Tick Enable better password policies (off after installing)
to also require at least one capital letter, one number and one special character such as ! or
#. A password that does not qualify is refused with "The password must be at least 6 characters and contain
at least one uppercase character, one number, and one special character."
The rule is checked whenever someone chooses a password: at sign-up, when changing it in Settings and when resetting a forgotten one. Existing passwords keep working.
Login lockout#
To slow down people who try to guess passwords, the site stops accepting sign-in attempts for a while after too many of them.
| Setting | After installing | What it does |
|---|---|---|
| Bad login limit | 10 | how many sign-in attempts with the same e-mail or user name, from the same internet address, are accepted within the lockout time |
| Lockout time (minutes) | 1 | how long the counting period, and so the lockout, lasts |
When the limit is reached, the member sees "Too many failed login attempts." and can try again once the lockout time has passed. The same limit applies to signing in with a passkey and to entering a two-factor code; there the message is "Too many requests in 1 minute. Try again later." Someone guessing from another address does not lock the real member out. If you leave a field empty or enter 0, the site uses 300 attempts and 5 minutes instead; for real protection keep small numbers such as 5 attempts and 15 minutes. The lockout applies to your site and the app, not to the AdminCP sign-in page.
The lockout counts by the address that connects to the web server. Behind Cloudflare or another proxy that is the proxy's address, so all visitors share it: someone guessing a member's password then locks that member out for the lockout time. Limit repeated sign-in attempts in the proxy or CDN as well.
Change log#
Last updated: 2026-11-17 · v1.5.6
| Date (GMT+7) | Section | What changed |
|---|---|---|
| 2026-11-17 | all | First version for 1.5.6, written from the 1.5.6 code as a guide for site owners and their admins. |
| 2026-11-17 | social-login, openid-provider, two-factor, phone-verification, password-policy | Corrections after review: the Facebook data-deletion address, what social login does not check, copying the addresses of a new provider, switching a 2FA provider off, Verify phone in Manage Users, the two-factor limit message and the lockout behind a proxy. |
Social login (OpenID providers)#
Last updated: 2026-11-17 · v1.5.6
AdminCP → Site Settings → Manage OpenID
Social login lets people sign up and sign in with an account they already have elsewhere, such as Google or Facebook, instead of a new password. Each such service is called a provider. The screen (titled OpenID Providers) lists four ready-made providers: Facebook, Google, Linkedin and Twitter. They are all inactive after installing, because each needs keys from the provider.
Switch on a built-in provider#
https://example.com/openid/auth/Google./1). Facebook also asks for data-deletion instructions: give it the address of a page on your site (for example a static page) that tells members how to delete their account themselves in Settings → Delete Account.What you should see: "Provider has been successfully updated." and Yes in the Active column.
What you should see: the provider asks you to sign in and allow access, then you are back on your site, signed in.
The providers' own websites change their screens often; follow their help pages for the exact clicks. Drag rows by their handle to change the order of the logos. The four built-in providers cannot be deleted and their App name cannot be changed; switch Active off to hide one.
What members see#
An account created through social login only has to pass User registration and the e-mail and user-name bans. It does not need an invitation code, and the required date of birth, gender, avatar and location and the Age restriction are not asked. If your site is invitation-only or age-restricted, switch the social providers off (untick Active).
Add another provider#
Any service that offers standard OAuth 2.0 or OpenID Connect sign-in can be added with Create new, including another ShaunSocial site (see This site as an OpenID provider). The provider's developer documentation gives the values.
openid email profilesub,email,name,picture). User ID map and Name map are required