ShaunSocial user guide 1.5.6 / AdminCP
Mobile app settings
If you run the ShaunSocial mobile apps for Android and iOS, a few AdminCP settings connect your site to the app stores and to Apple's and Google's services: the apps' package name and bundle ID, push notifications for incoming calls on iPhones, buying eWallet credits inside the apps, the ads shown in the apps, and push messages you send to every app user. This page explains each setting from the site owner's side: what to enter and where in App Store Connect, the Apple Developer website or Google Play Console you find it. Building and publishing the apps themselves is not covered.
The Mobile Application screens#
Last updated: 2026-11-19 · v1.5.6
The AdminCP menu has a group Mobile Application with two screens:
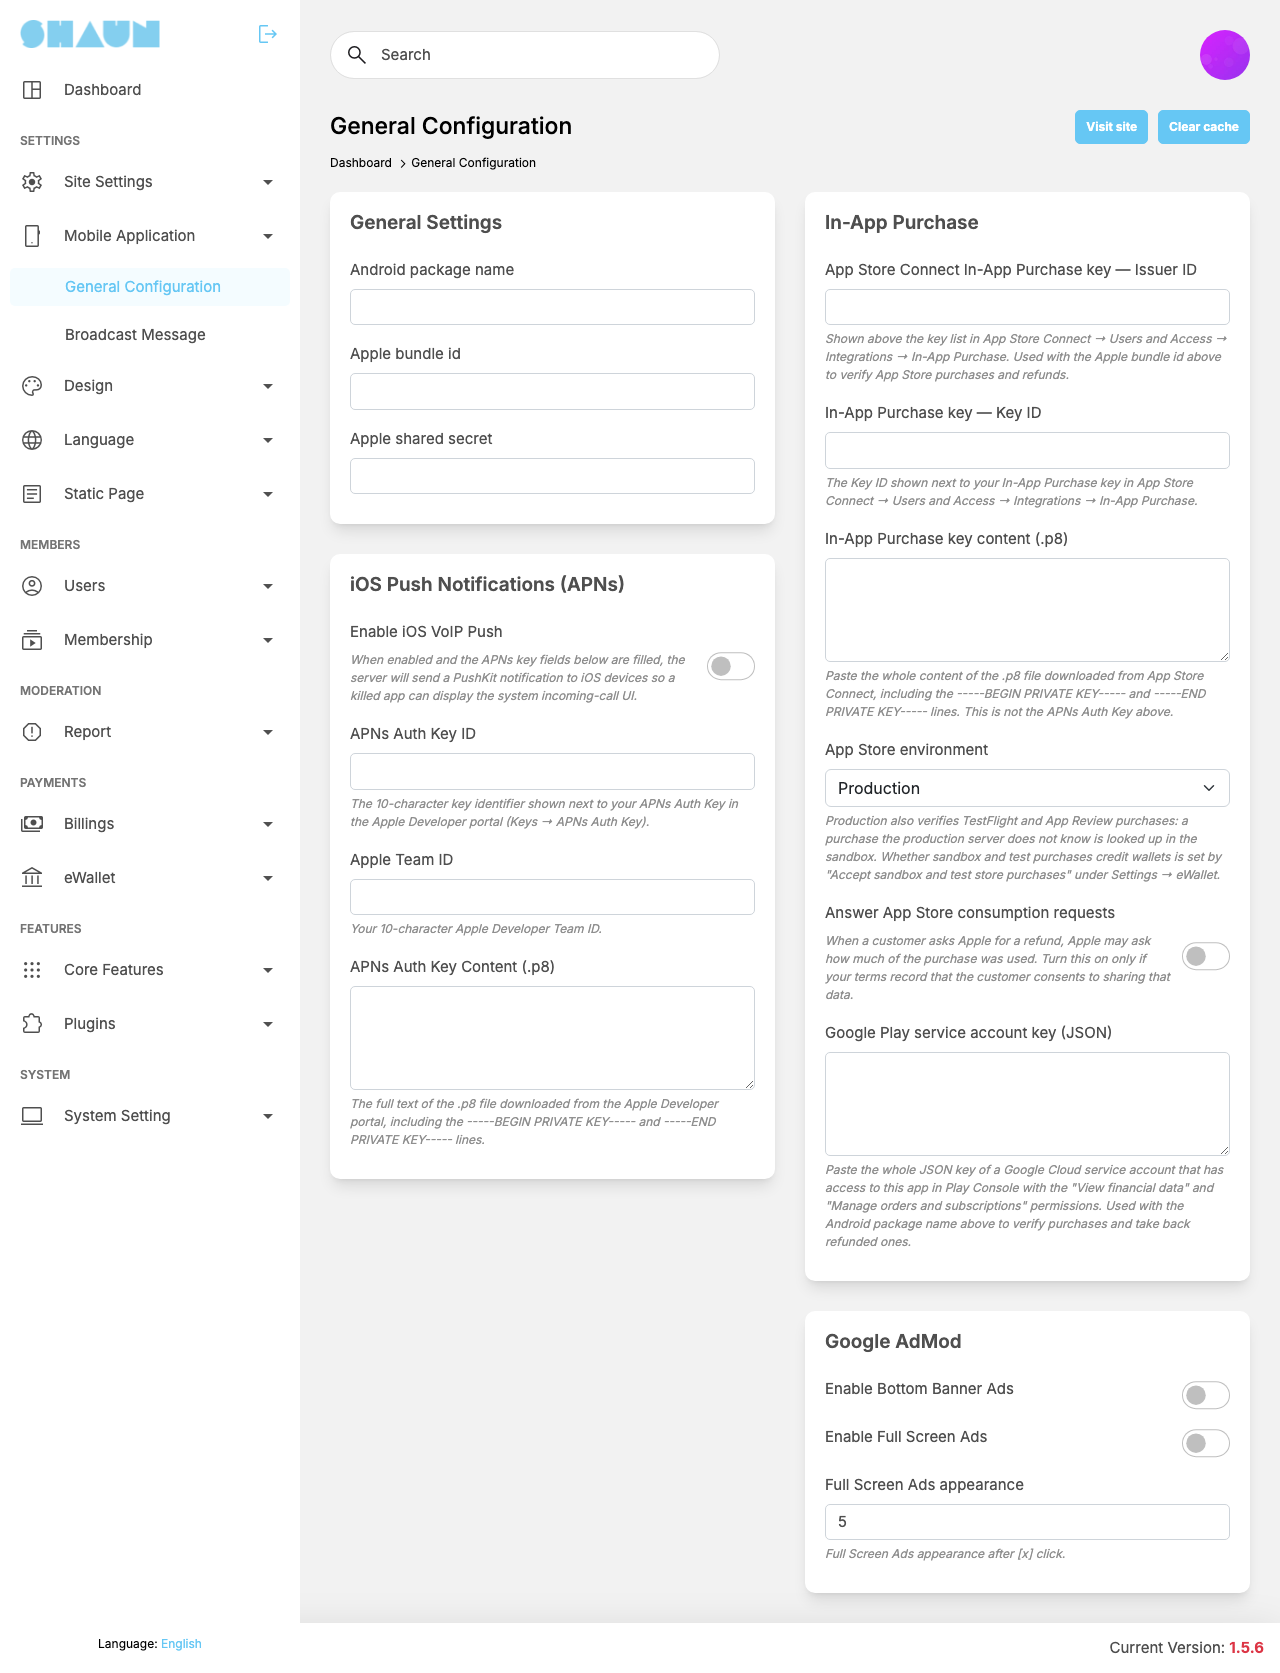
- General Configuration, made of four parts, in this order: General Settings (the apps' package name and bundle ID, see Package name and bundle ID), iOS Push Notifications (APNs) (see Incoming calls on iPhones), In-App Purchase (see Buying credits in the apps) and Google AdMod (see Ads in the apps). Like the other settings screens, it saves each field as you change it.
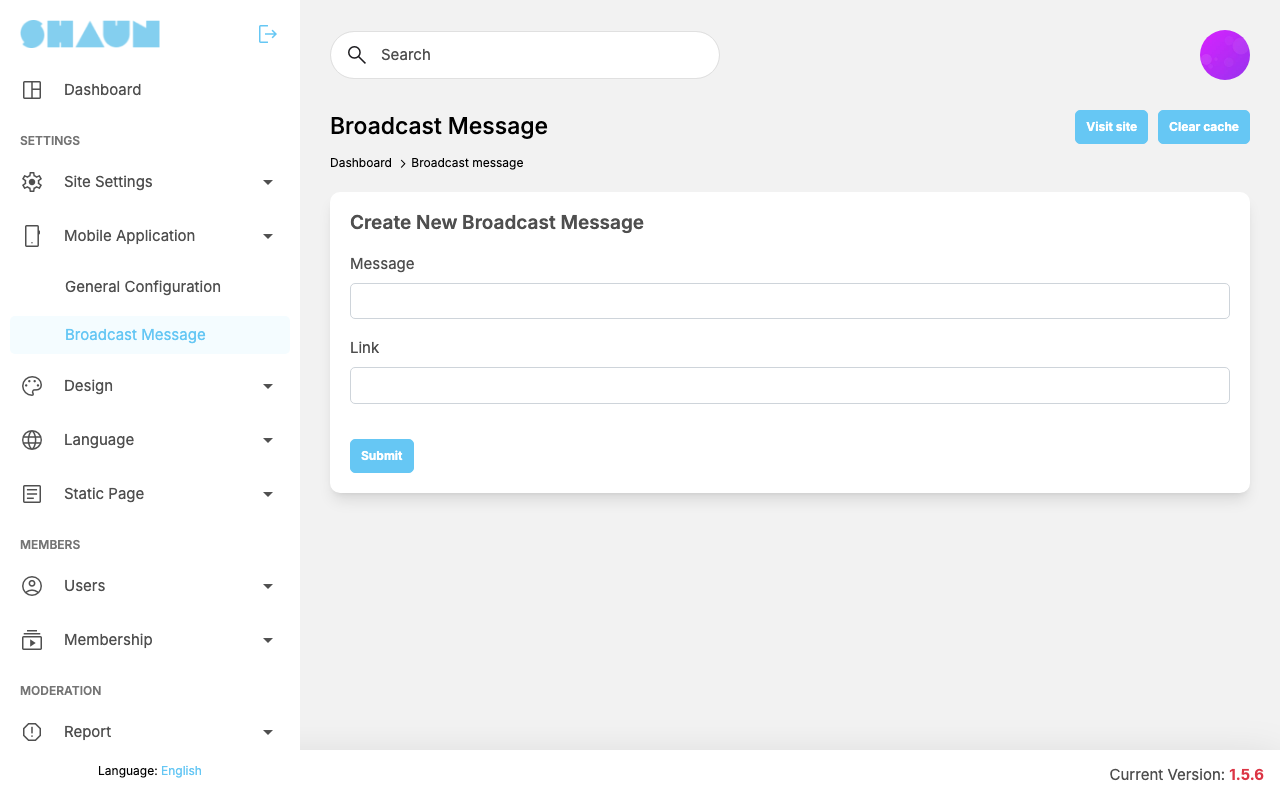
- Broadcast Message, which sends a push message to every app user (see Broadcast Message).
Super admins see both screens. A moderator needs the permissions Mobile General Configuration and Mobile Broadcast Message (see Every moderator permission). Every field on the General Configuration screen is empty or off after installing, except Full Screen Ads appearance (5) and App Store environment (Production). You need these settings only for features you use: an app without in-app purchases needs nothing in that part.
This page was written from the 1.5.6 code. The steps in App Store Connect, on the Apple Developer website and in Google Play Console were not run for this guide, and those consoles rename their menus from time to time: look for the same words if a menu is named a little differently.
Settings on other screens that the apps follow#
The apps work from the same site as your website, so most settings apply to both. These are worth checking when you start with the apps:
- API Secret Key (General Configuration → General Settings): must match your app's key before you switch on reCAPTCHA; see If you also run the ShaunSocial mobile apps.
- Android app link and IOS app link (Site Information → Android & IOS Apps): the store links your website offers to visitors on phones; see Android & IOS Apps.
- Push notifications to the apps need the Firebase service-account file on your server, the same file browser notifications use; see the server note in Progressive web app.
- Live updates (new messages and notifications without reloading) use the Broadcast settings; see Live updates.
- Deposit packages carry the store product IDs for in-app purchases; see Buying credits in the apps.
Package name and bundle ID#
Last updated: 2026-11-19 · v1.5.6
Every app in the stores has a fixed technical name chosen when it was first built: the package name
on Android and the bundle ID on iOS, usually written like a reversed web address, for example
com.example.community. Your site needs them to check that a purchase or a push notification belongs to
your app.
| Setting | After installing | What it is for | Where to find it |
|---|---|---|---|
| Android package name | empty | checking Google Play purchases and taking back refunded ones (see Buying credits in the apps) | Google Play Console: it is shown under your app's name in the list of apps and on the app's dashboard |
| Apple bundle id | empty | checking App Store purchases and refunds, and sending incoming-call pushes to iPhones (see Incoming calls on iPhones) | App Store Connect: open your app, then App Information → Bundle ID |
| Apple shared secret | empty | not used by 1.5.6: App Store purchases are checked with the In-App Purchase key instead. Leave it empty | - |
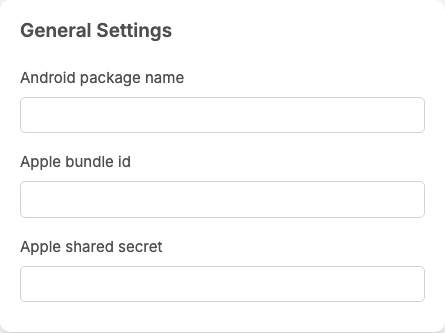
Copy the values exactly as the stores show them; ask whoever builds your app if you are not sure which name it was built with.
Incoming calls on iPhones (iOS VoIP push)#
Last updated: 2026-11-19 · v1.5.6
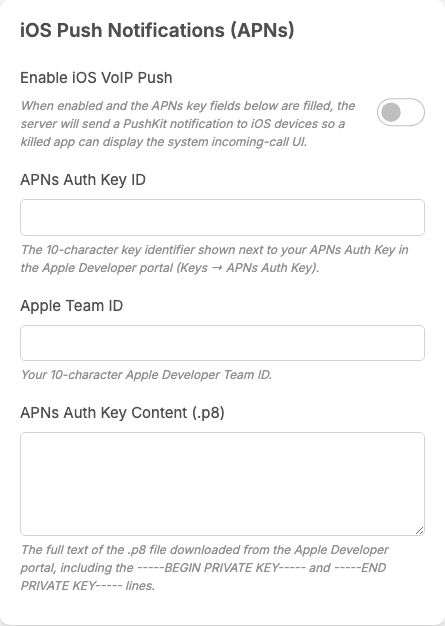
Ordinary push notifications reach both apps through Firebase and need nothing on this screen. This part is only for calls: when a calling plugin is installed, it lets an iPhone ring with the phone's own incoming-call screen even when the app is completely closed. Apple delivers such pushes only through its own service (APNs), with a key from your Apple Developer account. Core ShaunSocial has no calls of its own, so without a calling plugin you can leave this part empty.
| Setting | After installing | What it does |
|---|---|---|
| Enable iOS VoIP Push | off | on: the site sends incoming-call pushes to iPhones through APNs. They are sent only when the three fields below and Apple bundle id (see Package name and bundle ID) are all filled; while anything is missing, the site sends none |
| APNs Auth Key ID | empty | the 10-character ID of your APNs key |
| Apple Team ID | empty | the 10-character ID of your Apple Developer team |
| APNs Auth Key Content (.p8) | empty | the whole text of the key file, including the -----BEGIN PRIVATE KEY----- and -----END PRIVATE KEY----- lines |
- Sign in to the Apple Developer website with the account that publishes your iOS app and open Certificates, Identifiers & Profiles → Keys.
- Add a key with Apple Push Notifications service (APNs) ticked and download it. Apple lets you download
the
.p8file only once: keep it somewhere safe. - Copy the key's Key ID into APNs Auth Key ID. Your Team ID is shown in your account's membership details; copy it into Apple Team ID.
- Open the
.p8file in a text editor, copy all of it and paste it into APNs Auth Key Content (.p8). - Check that Apple bundle id is filled in, then tick Enable iOS VoIP Push.
What you should see: with the app closed on an iPhone, a call from another member shows the phone's incoming-call screen.
Apple uses separate keys for push notifications and for in-app purchases. The APNs key goes here; the In-App Purchase key goes in the In-App Purchase part (see Buying credits in the apps). The iOS app must also be built with incoming-call support; ask whoever builds your app.
Buying credits in the apps (in-app purchases)#
Last updated: 2026-11-19 · v1.5.6
In the apps, members add credits to their eWallet by paying through the App Store or Google Play, as the stores require for digital goods. Each purchase is one of your deposit packages: the member pays the store's price and receives the package's amount of credits. The store keeps its commission and pays you the rest; the credits then work exactly like credits bought on the website (see How the eWallet works).
The whole setup, step by step, with the store consoles, test accounts, the first App Store submission and troubleshooting, is in In-app purchases in the ShaunSocial mobile app guide, with one page for Google Play (Android) and one for the App Store (iOS). This section explains the AdminCP fields themselves.
Set it up#
- Create the store products. In Google Play Console (your app's in-app products, under Monetize) and in App Store Connect (your app → In-App Purchases, type Consumable), create one product per package you want to sell in the apps, with its price. Note each product ID.
- Put the IDs on your packages. In AdminCP → eWallet → Deposit Packages, edit each package and enter the IDs in Google product id and Apple product Id, exactly as in the stores (see Deposit packages). The package must be active.
- Fill in the package name and bundle ID (see Package name and bundle ID).
- Apple key. In App Store Connect open Users and Access → Integrations →
In-App Purchase, generate a key and download its
.p8file (only once). Copy the Issuer ID shown above the list of keys, the key's Key ID and the whole text of the.p8file into the three Apple fields below. - Apple refund notices. In App Store Connect open your app → App Information → App Store
Server Notifications and enter, for the production server,
https://example.com/api/wallet/apple_notification(with your own domain), version 2. Your site then hears about refunds. - Google key. In Google Cloud, create a service account for the project linked to your Play Console and download a JSON key for it. In Play Console open Users and permissions, invite the service account's e-mail address, give it access to your app with the permissions View financial data and Manage orders and subscriptions, and paste the whole JSON key into Google Play service account key (JSON).
- Buy the smallest package in each app with a test account.
What you should see: the credits arrive in the member's eWallet, and the purchase appears in its transactions.
The In-App Purchase settings#
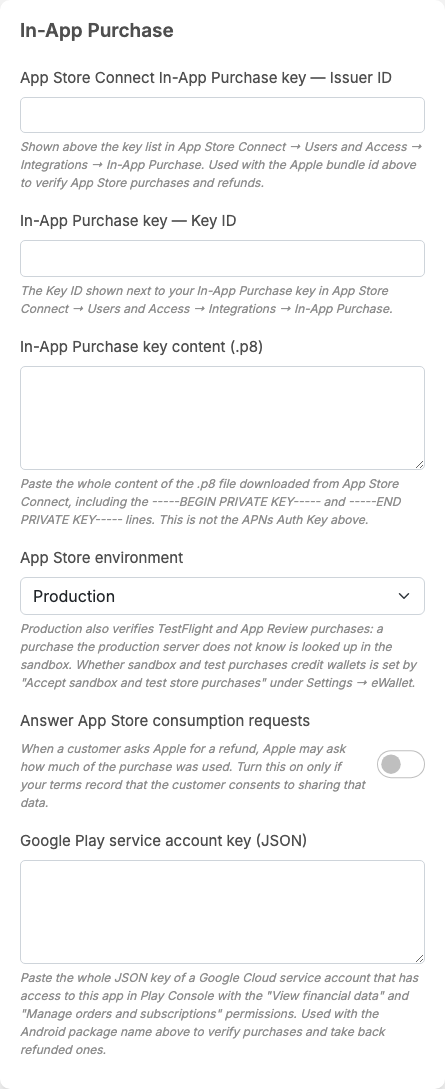
| Setting | After installing | What it does |
|---|---|---|
| App Store Connect In-App Purchase key — Issuer ID | empty | with the two fields below and the Apple bundle id, lets your site check App Store purchases and refunds |
| In-App Purchase key — Key ID | empty | the ID shown next to your In-App Purchase key |
| In-App Purchase key content (.p8) | empty | the whole text of the key file. This is not the APNs key of the push part |
| App Store environment | Production | leave it on Production: it also checks purchases made with TestFlight and during App Review. Sandbox is only for testing with an app build that is not in the store |
| Answer App Store consumption requests | off | when a customer asks Apple for a refund, Apple may ask how much of the purchase was used. On: your site answers from the member's eWallet balance (not used, partly used or fully used). Apple accepts this only with the customer's consent, so switch it on only if your terms record that consent |
| Google Play service account key (JSON) | empty | with the Android package name, lets your site check Google Play purchases and take back refunded ones |
One more setting is in the eWallet part of AdminCP → Site Settings → General Configuration:
| Setting | After installing | What it does |
|---|---|---|
| Accept sandbox and test store purchases. Keep this on while a build is in App Store / Google Play review — reviewers pay with sandbox accounts, and those purchases credit real wallets. | on | on: purchases made with test accounts (Apple sandbox and TestFlight, Google Play test purchases) add credits like real ones. Off: such a purchase is refused with "Test purchases are not accepted." Keep it on while a version of your app is in store review; once it is approved you may switch it off so test accounts cannot create credits |
Refunds and other events#
- An App Store refund arrives through the refund notices of step 5: the credits are taken back at once, even when that takes the member's balance below zero. The member gets the notification "Your store purchase was refunded, so … were taken back from your eWallet." and the e-mail "A store refund was taken back from your eWallet" (template When a store refund takes credits back from the eWallet in Mail Templates). The root admin account gets a notification with the member's new balance; credits the member already withdrew cannot be recovered automatically. When Apple reverses a refund, the credits are returned and the member is told.
- A Google Play refund is picked up by a background task once an hour (it needs the cron job, see Tasks), with the same result and notifications. The first time the task runs it marks the starting point; refunds from before that point are not taken back.
- A product ID that matches no active package: the member's payment adds no credits, and the root admin account gets a notification that names the product. Activate or correct the package; the app sends the purchase again and it is then credited.
- A purchase counts once. The same store purchase sent again is not credited twice; sent again from another member's account, it is refused with "This purchase belongs to another account."
Ads in the apps (Google AdMob)#
Last updated: 2026-11-19 · v1.5.6
The apps can show Google AdMob ads, which earn you money from Google. Your AdMob account and its ad units are part of the app build; these switches only turn the two kinds of ads on and off for everyone using your apps.
| Setting | After installing | What it does |
|---|---|---|
| Enable Bottom Banner Ads | off | a small banner ad at the bottom of the app screens |
| Enable Full Screen Ads | off | a full-screen ad that appears between screens |
| Full Screen Ads appearance | 5 | how often the full-screen ad appears: after this many moves from one screen to another ("Full Screen Ads appearance after [x] click."). Empty or 0 counts as 5. A larger number shows fewer ads |
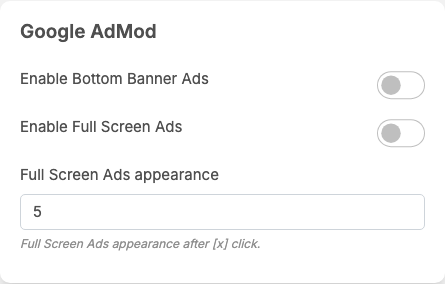
These ads are separate from the ads members buy on your site (see Advertising): the role permission Show ads and an ad-free membership do not hide AdMob ads in the apps. If AdMob ads are not set up in your app build, leave both switches off.
Broadcast Message: a push message to every app user#
Last updated: 2026-11-19 · v1.5.6
Use it for announcements, for example planned maintenance or a new feature. The message arrives as a push notification on every phone where a member is signed in to one of your apps; members who are signed out, and people who use only the website, do not get it. It is not added to anyone's notification list on the site.
- Open the screen. Under Create New Broadcast Message, write the Message (required, up to 255 characters).
- Optionally enter a Link: a full address starting with
https://, for example a post you want to point to. It is sent along with the message. - Click Submit.
What you should see: "Broadcast message has been successfully sent." The notification shows your profile picture.
The message goes out at once and cannot be called back. If the screen answers "Please config google firebase server key.", the Firebase service-account file is missing on your server (see the server note in Progressive web app): without it the apps receive no push notifications at all.
Change log#
Last updated: 2026-11-19 · v1.5.6
| Date (GMT+7) | Section | What changed |
|---|---|---|
| 2026-11-19 | all | First version for 1.5.6: the AdminCP settings of the mobile apps, written from the 1.5.6 code. |
| 2026-11-19 | overview, app-identity, ios-voip-push, in-app-purchases, app-ads, broadcast-message | Screenshots of the General Configuration screen, its four parts and Broadcast Message. |
| 2026-11-19 | in-app-purchases | Link to the step-by-step In-app purchases page of the new ShaunSocial mobile app guide. |
| 2026-11-19 | in-app-purchases | Links to the two new store pages of the mobile app guide: the In-app purchases page was split by platform, so Android and iOS have their own pages. |